This is the second post in the series – ASP.NET Core Security. In my last post, I covered how to get started with ASP.NET Core Identity. In this article, we will learn about claims and how to implement ASP.NET Core Identity claims-based authorization.
- ASP.NET Core Identity – Getting Started
- ASP.NET Core Identity Claims-based Authorization
- ASP.NET Core Identity Identity Roles based Authorization
- Implement Cookie Authentication in ASP.NET Core
- Secure Applications with OAuth2 and OpenID Connect in ASP.NET Core 5 – Complete Guide
- Custom Identity User Management in ASP.NET Core – Detailed Guide
Before you start reading this I would suggest that first, you read my previous article about ASP.NET Core Identity – Getting Started
Table of Contents
What are the claims?
The identity of the user consists of a set of properties like Unique Id, Name, Email Id, Email Verified, etc and these properties are called claims. A claim set is a list of properties that belongs to the user. Claims contain information about the user that can be used to build a flexible authorization model. These claims get assigned to the user when a new user is created using the register link. A claim is typically like a key-value pair.
ASP.NET Core Identity by default comes with claims for a user and we can implement our own custom claims as well. There can be multiple claims of the same type.
Authorization using a claim can be implemented based on the value of the claim for that user. Access to protected resources can be determined by comparing the claims needed to access the resource with the claims available for the user.
Implement a Custom Claim
In our previous demo, we created a custom user profile property Full Name which we will add to our list of custom claims i.e. claim list will contain a custom claim ‘FullName’
We will work on the source code which we created as part of the previous article where we added Identity to an existing Sample Blog Application. Here is the link to base source code which will be used for this demonstration.
https://github.com/procodeguide/Sample.Identity.GettingStarted
Display all claims
First, let’s add a link to display all the claims from the identity of the logged-in user. We will add a new link ‘Claims’ besides post link & corresponding action in new user controller & cshtml to display all the available claims.
Add user controller
Add user controller to implement action for list of claims for the user
[Authorize]
public class UserController : Controller
{
    private readonly ILogger<UserController> _logger;

    public UserController(ILogger<UserController> logger)
    {
        _logger = logger;
    }

    public IActionResult Claims()
    {
        return View();
    }
}
Add view to display claims
This cshtml will iterate claims in identity user object to display all the available claims.
@model List<Post>
@{
    ViewData["Title"] = "View User Claims";
}
<h1>@ViewData["Title"]</h1>

<br />

@if (User.Identity.IsAuthenticated)
{
    <table class="table table-responsive-sm">
        @foreach (var claim in User.Claims)
        {
        <tr>
            <td>@claim.Type</td>
            <td>@claim.Value</td>
            <td>@claim.Issuer</td>
        </tr>
        }
    </table>
}
Add link for claims
We will add a menu or link besides posts link to display all claims. This will call Claims action in the User controller to display claims.cshtml which contains logic to display all claims of the logged-in user. Add the below code in application _Layout.cshtml page
<li class="nav-item">
    <a class="nav-link text-dark" asp-area="" asp-controller="User" asp-action="Claims">Claims</a>
</li>
Running the application & clicking on claims (post login) will display list of claims as shown below
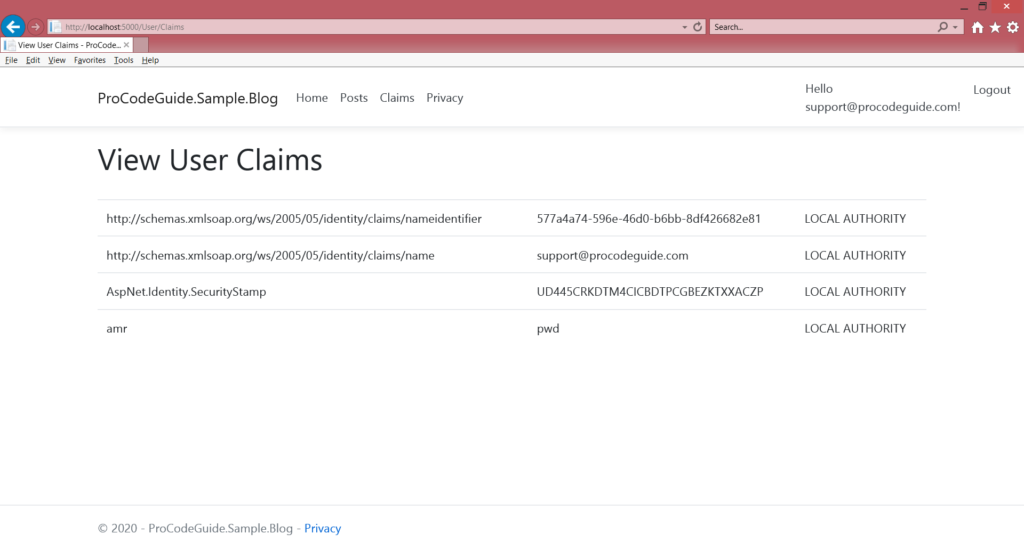
We can see the list of default identity claims and now lets try to understand how to add a custom claim to identity.
Add custom claims
As part of article Identity – getting started we created a custom user profile property Full Name & now let’s make that Full Name as part of claims by adding a custom claim.
Add application level user claims principal factory
We will have to add application specific user claim principal factory that derives from Identities generic user claim principal factory which takes type of application specific user class i.e. SampleAppUser. In this we will have to override function GenerateClaims and add our application specific claim ‘FullName’ to it.
public class ApplicationUserClaimsPrincipalFactory : UserClaimsPrincipalFactory<SampleAppUser>
{
    public ApplicationUserClaimsPrincipalFactory(
        UserManager<SampleAppUser> userManager,
        IOptions<IdentityOptions> options
        ) : base(userManager, options)
    {

    }

    protected override async Task<ClaimsIdentity> GenerateClaimsAsync(SampleAppUser user)
    {
        var identity = await base.GenerateClaimsAsync(user);

        identity.AddClaim(new Claim("FullName",
            user.FullName
            ));

        return identity;
    }
}
Register claims factory in startup class
You will have have to add an application-specific user claims principal factory to dependency injection container.
services.AddScoped<IUserClaimsPrincipalFactory<SampleAppUser>, ApplicationUserClaimsPrincipalFactory>();
Now when you run the application and navigate to claim link and post login you should be able to see FullName in claims list.
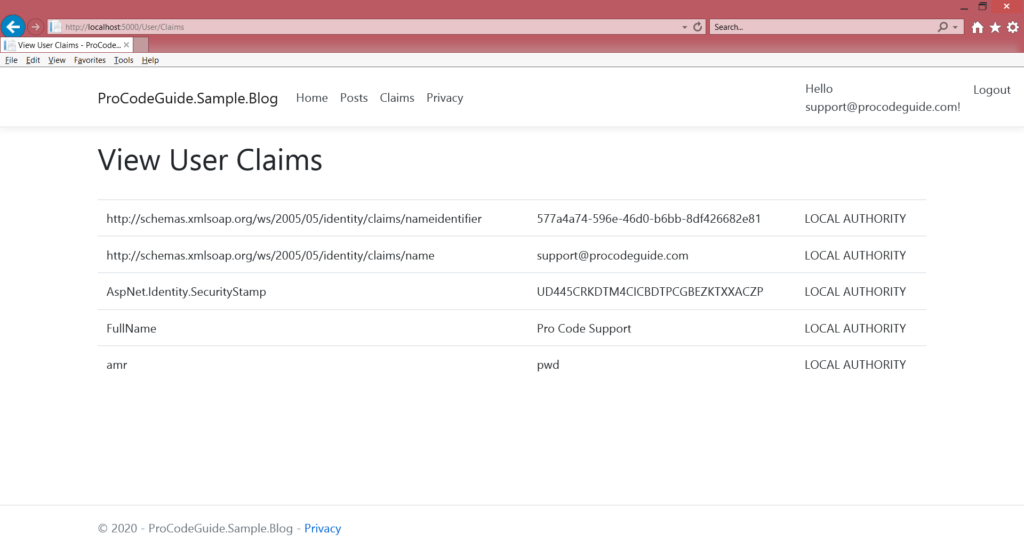
Claim based authorization
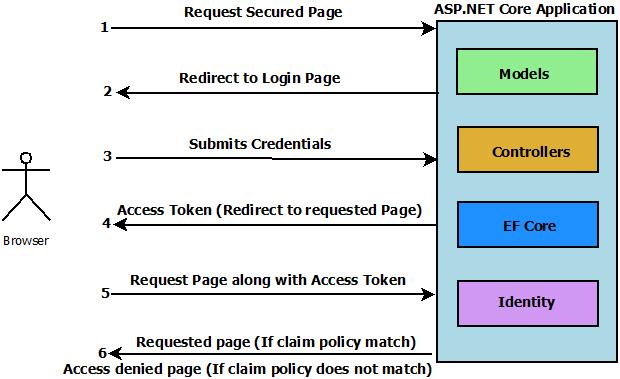
ASP.NET Core Identity claims can be used to implement authorization i.e. based on user claim value we can decide whether access to a specific resource will be able or not to that user. e.g. in our case, we can configure authorization based on email id i.e. only user with email id support@procodeguide.com should be able to view the post details page.
Implement claim based authorization
In our Sample Blog App, we will implement authorization based on email id i.e. if user email id is support@procodeguide.com then access to action Details in post controller will be allowed else it will be denied.
Register claim policy in startup class
Add the policy for user email id in the startup class. Here we have registered an authorization policy named EmailID using claim key http://schemas.xmlsoap.org/ws/2005/05/identity/claims/name (email id) equal to support@procodeguide.com. Add this code does not enable any authorization as it is registering a policy. We will have to apply this policy either to a controller or action to enable it.
public void ConfigureServices(IServiceCollection services)
{
    services.AddControllersWithViews();
    services.AddRazorPages();

    services.AddAuthorization(options =>
    {
        options.AddPolicy("EmailID", policy =>
        policy.RequireClaim("http://schemas.xmlsoap.org/ws/2005/05/identity/claims/name", "support@procodeguide.com"
        ));
    });
}
Apply claim policy to controller action
Claim policy EmailID which we created above is applied to Action Details in the posts controller. This means that posts/details is allowed only for the user whose email id is support@procodeguide.com
[Authorize(Policy = "EmailID")]
public IActionResult Details(string id)
{
    Post post = DataHelper.GetAllPosts().Find(p => p.Id.Equals(id));
    return View(post);
}
You can specify multiple policies as well for controller or actions. In case of multiple policies all the policies need to confirm before granting access.
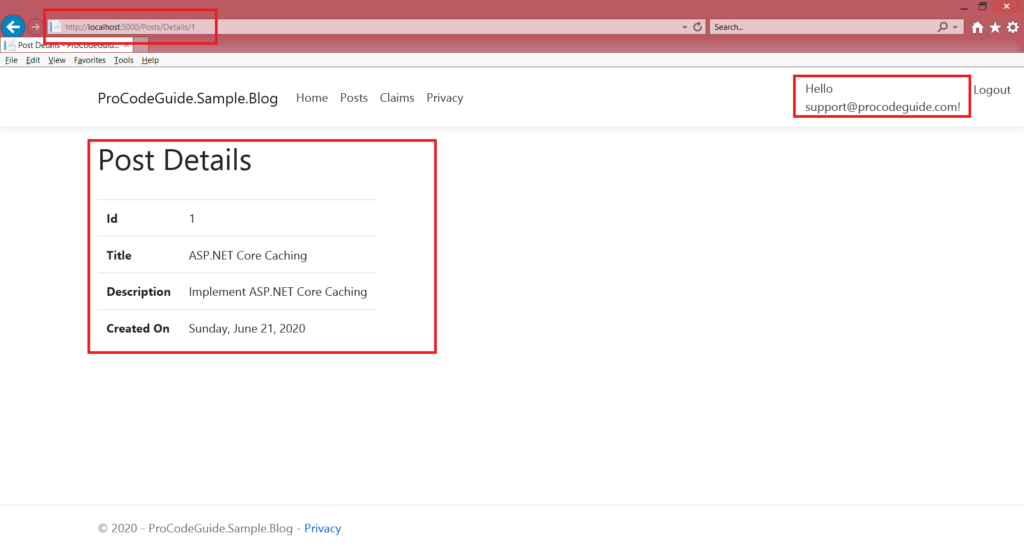
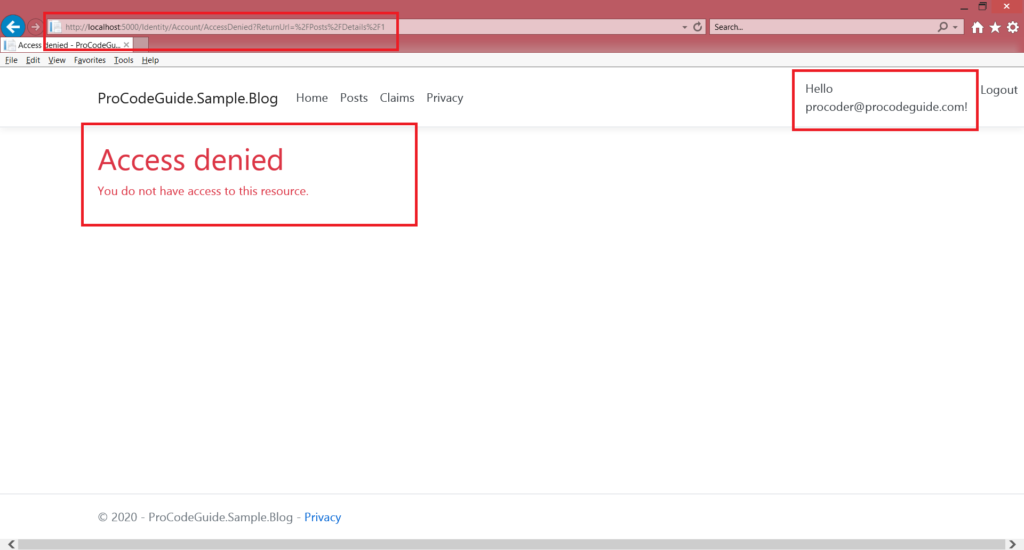
Now run the run and check action post/details with different users. We will see that action post/details is allowed to support@procodeguide.com and access is denied to user procoder@procodeguide.com
Summary
In this article, we learned about Identity claims, configure custom claims & claim based authorization. Though claims can be used for authorization roles are a more standard way of implementing authorization as the same role can be specified for multiple users.
In our next article in this series for ASP.NET Core Identity, we will learn about roles and how to how to implement role-based authorization.
References – https://docs.microsoft.com/en-us/aspnet/core/security/authorization/claims?view=aspnetcore-3.1
Download Source Code
https://github.com/procodeguide/Samples.Identity.Claims
Hope you found this article useful. Please support the Author

