In this article, we will learn about what is routing in ASP.NET Core MVC with examples and also learn about how to configure routing in ASP.NET Core MVC applications.
We will make use of Visual Studio 2022 Community Edition with .NET 6.0 to demonstrate the configuration and workings of routing in ASP.NET Core MVC.
Table of Contents
Routing in ASP.NET Core
The routing in ASP.NET Core is the configuration code that is responsible for matching the incoming requests to the controllers and their actions i.e. the path in the incoming URL is matched with the corresponding controller action and the mapped action gets executed.
Using routing the ASP.NET Core framework maps the incoming URL to the controller’s action and then executes that action. When a URL is requested then the URL is first handled by the routing middleware to find the matching controllers action for the requested URL path. If there is a matching route (controllers action) available for the requested URL path then that action will be executed else routing middleware will return HTTP status 404 as the response for the request.
ASP.NET Core MVC supports two approaches for routing in ASP.NET Core i.e. Conventional based routing where we define the routes in the startup code & Attribute-based routing using which we decorate controllers or actions with attributes to define routes.
Conventional Routing
In this approach for routing in ASP.NET Core one or more conventions are configured for the routing that will be used to match the incoming URL path to the endpoints. In ASP.NET Core applications these endpoints are actions in the controllers.
When we create a default ASP.NET Core MVC application then a default routing also gets configured in the startup. This routing is used for mapping URL paths to the controller actions.
Below is the routing that gets configured in the Program.cs file when you create the default ASP.NET Core Web App project type in Visual Studio 2022 Community Edition & .NET 6.0
app.MapControllerRoute(
    name: "default",
    pattern: "{controller=Home}/{action=Index}/{id?}");
The method MapControllerRoute is used to configure the routing in the application and this routing is named default routing.
The default route is configured as {controller=Home}/{action=Index}/{id?} & there are 3 parts to this route as discussed below
{controller=Home} – As the name suggests this 1st part maps to the controller name. Also, the default controller specified is Home i.e. if no controller is specified then it will default to Home controller.
{action=Index} – Again as the name suggests this 2nd part maps to the action name. Also, the default action specified is Index i.e. if no action is specified then it will default to Index action.
{id?} – This 3rd part maps to the model entity. The ? in the route make this part optional.
Using this default route a URL like http://Server:PortNo/Employee/Details/1 will look for an action method named Details in Employee Controller and will also pass an argument Id will value as 1 to the action method. This Id parameter is optional i.e. action can be mapped and executed without the optional Id parameter specified. When Id is not specified in the URL then generally Id is set to 0 by the model binding.
Also, in the default route configuration, the default controller and action are also specified as Home & Index respectively i.e. if no controller and action name are specified in the URL i.e. a URL like http://Server:PortNo with no path specified will match to the Index action method in the Home controller. You can modify this default controller and action name as per your application requirements.
Also, note that if you use the URL like https://Server:PortNo/Employee then it will map Employee in the URL path to the Employee controller and since action name is not specified it will look for default action Index in the Employee controller as default for action is Index in the Route.
As observed the conventional-based routing makes use of only controller and action names for mapping. Using this conventional-based routing allows developers to implement consistent URL patterns across the application.
Multiple Conventional Routes
Yes, we can configure more than one conventional route by using the method MapControllerRoute more than once. Defining multiple conventional routes allows to add multiple conventions or adding conventional routes that are dedicated to the specific sections.
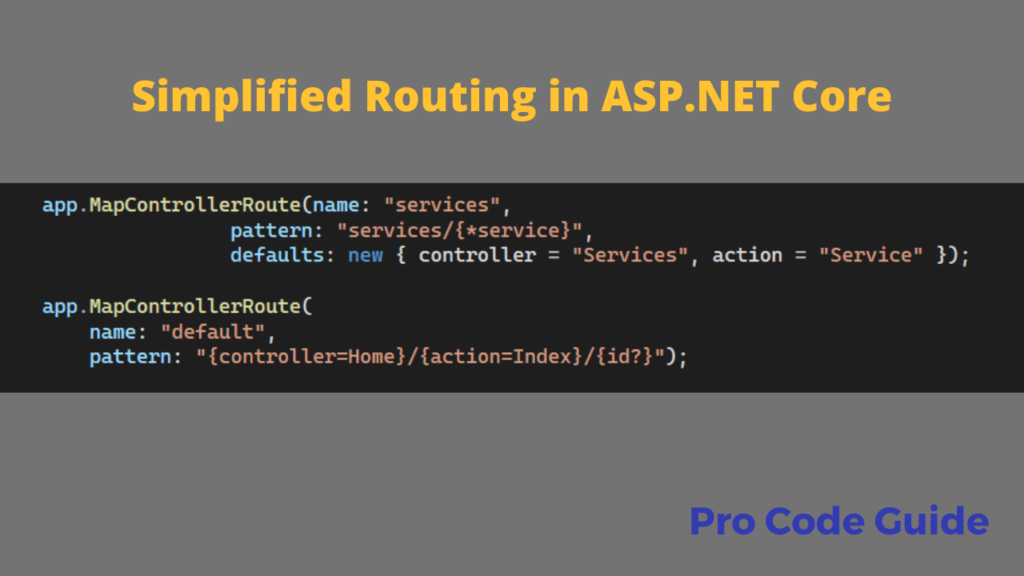
You can configure multiple conventional routes in the Program.cs file as per the code shown below
app.MapControllerRoute(name: "services",
                pattern: "services/{*service}",
                defaults: new { controller = "Services", action = "Service" });

app.MapControllerRoute(
    name: "default",
    pattern: "{controller=Home}/{action=Index}/{id?}");
The first route with name services is the dedicated conventional route. It is called the dedicated conventional route as it is the conventional route that is dedicated to a specific controller and action.
The dedicated conventional route template doesn’t specify the sections for controller and action instead it uses a specific template i.e. “services/{*service}” so it can only have the default values for action and controller. In this the default values for controller and action is specified as Services and Service respectively so this route will always map to the action Service in Services Controller i.e. Services.Service
The URL paths that will map to this route i.e. Services.Service actions are /Services, /Services/Service and /Services/{any-string}
Conventional routing in ASP.NET Core is order dependent i.e. the order in which conventional routes are configured decides the priority of the routes. So in our code above the services route has the highest priority as it is added first i.e. appears earlier to the default route. The Services route will be tried for mapping the URL path by the framework before moving to the next default route.
So far we learned about how to specify conventional routing and also how to configure multiple conventional routing. Next, let’s learn about the other approach available for routing in ASP.NET Core i.e. attribute-based routing
Attibute Routing
In attribute-based routing, we make use of [Route] attributes at the controller and/or action level to specify route details for your application. This is the preferred approach for routing in ASP.NET Core in controllers.
You can not only specify the route information using the [Route] attribute but can also specify the route details using the HTTP method attribute like [HttpGet], [HttpPost], and other verbs etc.
Attribute-based routing approach maps the URL path by directly applying route templates at the controller and action level. This approach generally does not make use of the {controller} or {action} tokens as they are not of any significance when you apply the route template at each controller/action level. But if you want you can make use of the {controller} or {action} token in the attribute routing as well. Specifying these tokens in attribute routing works in the same way as conventional routing i.e. token {controller} corresponds to the controller name and {action} token corresponds to the action name.
Attributes that are specified at the controller level get combined with the attribute at the individual action level to map the URL path to the controller actions. The attribute value specified at the controller level acts as a prefix to the attribute value at the action method level.
The route templates that are specified to action and begin with / or ~/ don’t get combined with route templates specified at the controller level.
Below is the sample code with routing attributes at the controller and action level.
[Route("Employee")]
public class EmployeeDetailsController : Controller
{
    [HttpGet("Index")]
    public IActionResult Index()
    {
        return View();
    }

    [Route("Details/{id:int?}")]
    public IActionResult GetDetails(int Id)
    {
        return View();
    }

    [Route("~/EmployeeDetails/All")]
    public IActionResult GetEmployees()
    {
        return View();
    }
}
The above actions in the EmployeeDetails controller get mapped to the URL like
Index Action – http://Server:PortNo/Employee/Index
GetDetails Action – http://Server:PortNo/Employee/Details & http://Server:PortNo/Employee/Index/123 (any integer number)
GetEmployees Action – http://Server:PortNo/EmployeeDetails/All
As you can see from the above example that the controller name and action name plays no role when the URL path is mapped to the controller’s action unless tokens are used in the attribute routes. In the Index method, we also saw how to use the HTTP verb attribute [HttpGet] to specify the route.
Multiple Attribute Routes
Same as conventional routing in ASP.NET Core this attribute-based routing also supports multiple routes for the same action. Below is an example of how we can specify multiple routes for the same action
[Route("Employee")]
public class EmployeeDetailsController : Controller
{
    [Route("")]
    [Route("Index")]
    public IActionResult Index()
    {
        return View();
    }

    [Route("Details")]
    [Route("Details/{id:int}")]
    public IActionResult GetDetails(int Id)
    {
        return View();
    }
}
So far we learned about how to configure routing in ASP.NET Core using both conventional & attribute routing approaches. We also saw how to configure multiple routes in both approaches.
Reserved Routing Keywords
The following keywords are reserved routing names when configuring routing in ASP.NET Core
- area
- controller
- action
- page
- handler
HTTP Verb Templates
ASP.NET Core supports the following HTTP verb templates
- HttpGet
- HttpPut
- HttpPost
- HttpDelete
- HttpHead
- HttpPatch
- HttpOptions
Summary
In this article, we learned about how to configure routing in ASP.NET Core using conventional & attribute-based routing. We also saw how to specify multiple routes.
For most of the ASP.NET Core MVC applications, the default conventional routing should work fine for all your requirements of routing in ASP.NET Core MVC but you can use attribute routing when you need to control URL path at the action level.
References – Routing in ASP.NET Core
You can check my other trending articles – Build Resilient Microservices (Web API) using Polly in ASP.NET Core & Microservices with ASP.NET Core 3.1 – Ultimate Detailed Guide
Hope you found this article useful. Please support the Author


One Comment