In this article, we will learn about the basics of async programming with its benefits in Web API, why do we need async API and also look at how to build an Async Web API with ASP.NET Core 6. We will also learn about how async Web API provides better scalability over sync Web API.
We will also learn about how asynchronous application helps us to vertical scale our Web API application. As part of this article, we will learn how to convert an ASP.NET Core Web API application into an asynchronous application using async & await keywords.
Both .NET & .NET Core applications can work asynchronously by making use of async & await keywords. Though we will look at how to apply asynchronous programming, using async and await, to ASP.NET Core Web API this will apply to other .NET applications as well. I suggest before reading this you also read my detailed article about Asynchronous Programming in .NET Core C# – using async & await
This article assumes that you have basic knowledge of C#, ASP.NET Core & how to build Web API in ASP.NET Core. For demonstrations in this article, we will be using Visual Studio Community 2022 17.0.0 with .NET 6
Table of Contents
Introduction to Async Programming
In the context of Web API, Asynchronous programming is used to improve the scalability of the application. By applying asynchronous programming using async and await there won’t be any direct performance gain in speed instead application will be able to handle more concurrent requests. There will be indirect performance gain as there will be an improvement in the average response time of the application if we are able to handle an increased number of concurrent requests.
When we deploy our Web API on IIS then each application runs in its own worker pool and this worker pool has a fixed number of worker threads that are used to handle requests from clients. When the number of concurrent requests to our application is more than the available number of worker threads then requests go to pending state till any of the active requests are complete.
Now if you want to improve this situation that requests doesn’t go into the pending state in the queue then you need to scale your application to better handle concurrent requests. There are 2 types of scaling options available i.e. vertical scaling or horizontal scaling. In horizontal scaling, you add more servers so that additional requests can be handled by different instances of applications hosted on another server.
In vertical scaling, we either improve the processing power of the available server by adding more memory\CPU etc or by improving the scalability of our application such that our application is able to better utilize the available resources and in turn can handle more concurrent requests. Asynchronous programming techniques helps us to improve the scalability of our application by using async & await.
We don’t improve the performance by applying async programming i.e. if saving a record to the database is taking 5 seconds or an external API call for Email/SMS takes 4 seconds then by implementing async we won’t be able to reduce this processing time. Instead by using async we await the response and release the thread (till we get a response) for processing of other requests in a queue.
Synchronous vs Asynchronous Request in Web API
Synchronous Requests
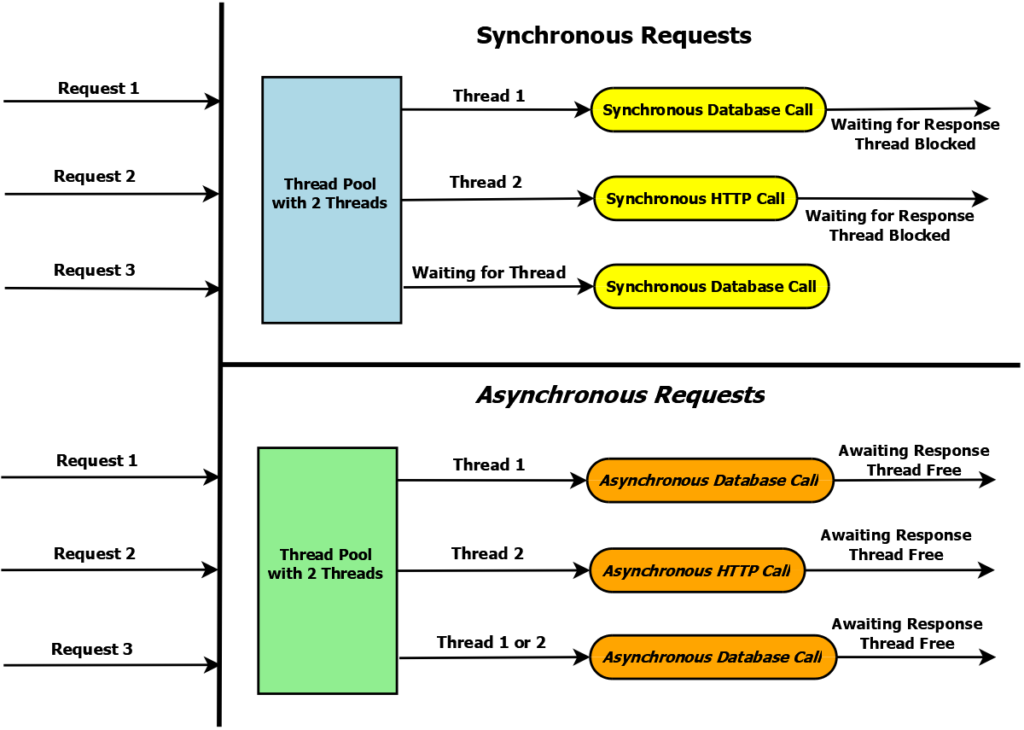
When a request arrives on the server then gets assigned a thread for execution from the thread pool. Thread pool contains a fixed number of threads that can be configured at the start of the application but cannot be changed at runtime. So the application has to manage throughput based on the number of available threads for execution.
When a number of concurrent requests arriving on the server exceed the number of available threads then the additional requests have to wait in queue till any request which is already executing completes and that thread becomes free and available in the thread pool for execution of the next request.
This wait queue also has a limit and if the number of requests waiting in a queue exceeds the limit then users with the new requests will start getting error responses from the server i.e. service is unavailable. Additionally, if the request is pending for execution for a long time then the client code will also timeout the request and receive a timeout exception.
Now if threads are waiting for long-running tasks like database call or HTTP call then that thread is assigned to the request but not doing anything other than waiting for the task to complete i.e. thread is blocked till the task completes.
Now till this task completes we should be able to utilize this thread for other requests this is where Asynchronous Programming techniques make a difference
Asynchronous Requests
In this scenario as well there is a fixed number of threads available in the thread pool for the execution of requests that arrives on the server. Also if the number of concurrent requests that arrives on the server exceeds the number of free threads available then additional requests go into wait state in queue. The difference between asynchronous from synchronous is threads are not blocked here for long-running tasks.
When a request arrives on the server then it gets assigned a thread from the thread pool for the execution of the request. When this request executes a long-running task like database call or HTTP call or IO operation then instead of waiting for the task to complete it awaits the task response and make threads available in the thread pool for processing of the next request waiting in the queue for execution. When the task completes the thread is re-assigned from the thread pool to the request to process task response and also for further execution.
This design allows us to handle a lot more concurrent requests as we are not blocking our threads instead task response is awaited and threads are free to process other requests till the task completes.
We saw how asynchronous programming improves the overall vertical scaling of the application as with the same available resources it is possible to handle a lot more requests. Also, this makes the application responsive to the users.
Advantages of Asynchronous Programming
Improves the overall scalability of the application by ensuring that we are able to handle more requests with the same resources available on the server. This is achieved by not blocking the threads for long-running tasks and releasing threads back to the thread pool to handle other requests in the queue when these long-running tasks are executing.
Handling more concurrent requests means users won’t have to wait long for their response. This implies there will be no timeouts and also server will rarely send error responses of Service not available (503) to the users.
There will also be an indirect improvement in the performance that if we are able to handle more concurrent requests then the average response time of the server will improve i.e. the user will get a response without delay and this will also improve overall user experience with the application.
How to use async & await in ASP.NET Core
Let’s understand the usage of async & await in async Web API with ASP.NET Core
In ASP.NET Core C# we make use of async and await keywords to implement asynchronous programming. For a method to be asynchronous we have to add the async keyword in the method definition before the return type of the method. Also, it is general practice to add Async to the name of the method if that method is asynchronous.
public async Task SaveDataAsync()
{
    //Save Data
}
Only adding the async keyword in the method definition doesn’t make it asynchronous you will also have to make use of await keyword within the method. If await keyword is not used in the method then it will execute like a “synchronous” method. Also adding async to the method definition make it possible to use await keyword inside the method
public async Task SaveDataAsync()
{
    await _dbcontext.SaveChanges();
}
We have added an asynchronous method to save data to the database. When the above method is executed then it will start executing like a normal synchronous method and start its execution. await keyword before the operation for saving to the database will start a new task for saving the changes to the database and pause the method execution till this task completes.
Till this database task completes the thread will be returned to the thread pool to handle other requests in the queue. When this task completes this method will again request a thread from the thread pool for completion of the method.
Async Return Types for Web API
void – The void return type can be used in asynchronous event handlers that require a void return type. For async methods that don’t return a value use Task instead of the void as async methods that return void cannot be awaited. In this case, the caller will be fire and forget method. The caller of an async method returning void cannot catch the exceptions thrown from the method.
public async void SaveDataAsync(Employee employee)
{
    _dbcontext.Employees.Add(employee);
    await _dbcontext.SaveChanges();
}
Task – Task is used when async methods don’t contain a return statement or that contains a return statement that does not return an operand. If this method had been synchronous then it would have returned void. The use of task return type for an async method allows the caller to await the response from the async method so that caller’s completion can be suspended till the async method has finished.
public async Task SaveDataAsync(Employee employee)
{
    _dbcontext.Employees.Add(employee);
    await _dbcontext.SaveChanges();
}
Task<TResult> – Task<TResult> is used when async methods contain a return statement that does return an operand. The use of Task<TResult> return type for an async method allows the caller to await the response from the async method so that caller’s completion can be suspended till the async method has finished.
public async Task<bool> SaveDataAsync(Employee employee)
{
    _dbcontext.Employees.Add(employee);
    await _dbcontext.SaveChanges();
    return true;
}
ValueTask<TResult> – After the release of C# 7.0 it was possible for async methods to return any type that has an accessible GetAwaiter method that returns an instance of an awaiter type. In addition, the type returned from the GetAwaiter method must have the System.Runtime.CompilerServices.AsyncMethodBuilderAttribute attribute. The Task & Task<TResult> are reference types so memory allocations particularly in tight loops can impact performance so introduction on generalized async return type (starting with C# 7.0) enabled performance improvements.
public async ValueTask<bool> SaveDataAsync(Employee employee)
{
    _dbcontext.Employees.Add(employee);
    await _dbcontext.SaveChanges();
    return true;
}
IAsyncEnumerable<T> – Starting with C# 8.0, an async method may return an async stream, represented by IAsyncEnumerable<T>. An async stream provides a way to enumerate items read from a stream when elements are generated in chunks with repeated asynchronous calls.
For further details on async return types, you can refer here
Scenarios for applying Async techniques
Before implementing the asynchronous technique in your code or method ask yourself a basic question regarding that piece of code like ‘will my code execution wait for a task to complete before it can continue ?” and if the answer to this question is yes then you need to consider asynchronous technique in this scenario as instead of waiting for the task to complete we will start the task and then await the task response.
Typical scenarios for calls where we should consider implementing asynchronous techniques are Input-output based tasks like File System operations (Read/write files) or database operations (add, update, delete or inquire data) or Network-based HTTP calls to third party API (Google API, Facebook API, Maps, SMS Services, EMAIL Service, etc.)
We can even consider asynchronous techniques in CPU bound requests i.e. tasks where we require CPU time for processing. CPU bound requests can be like where there is a large collection of objects that need to be looped or some heavy calculations (like premium calculation for insurance or interest calculation for long term loans) that requires CPU time or processing of lots of data points from some time-series database logs, etc.
Implementation of Async Web API with ASP.NET Core
Overall Approach for demonstration
Here are the details of the complete approach that has been taken for this demonstration of this async Web API with ASP.NET Core
- We will create the first ASP.NET Core Web API project for Employee service that contains an action method to return the Employee List
- We will be using Entity Framework Core with the model first approach to get employee details from the database. EF Core supports all the async methods for operations.
- We will add dummy data to the employee database to simulate the get action
- We will add both synchronous & asynchronous methods to EF Core and controller for the get action to understand differences between the two and also learn how to implement asynchronous methods in Web API
Here is the quick and short video on implementing async Web API with ASP.NET Core
Let’s first create the required project of type ASP.NET Core Web API that will be used to demonstrate how to implement Async Web API with ASP.NET Core
Create ASP.NET Core Web API Project
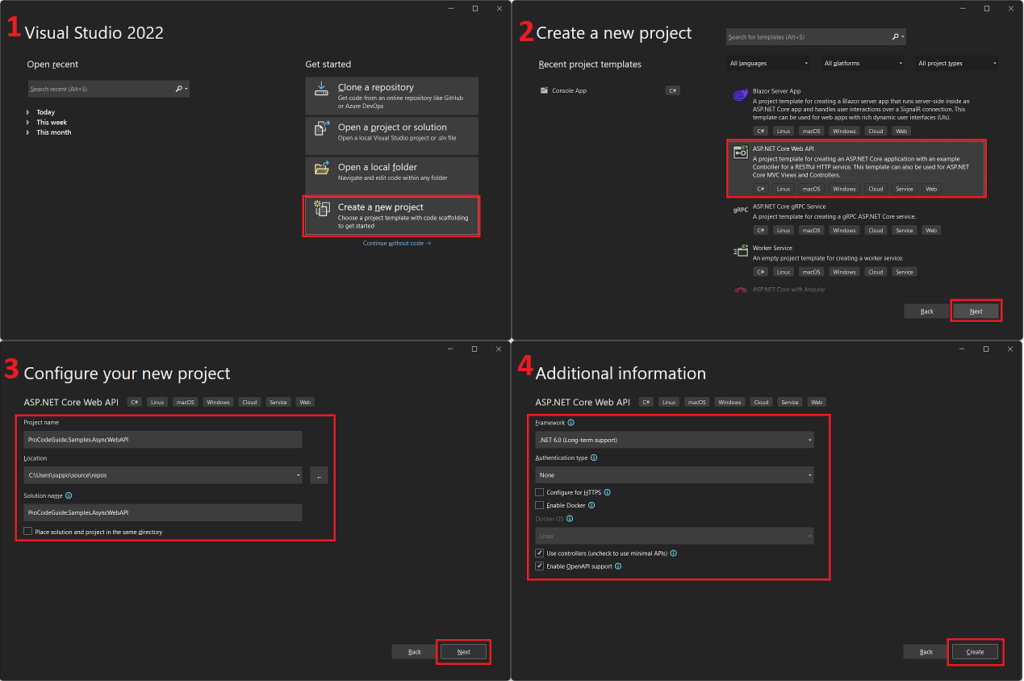
Create a new project of type ASP.NET Core Web API as per the screenshots shown below with the name as ProCodeGuide.Samples.AsyncWebAPI
Install required packages
For the demonstration of async web API with ASP.NET Core, we will be using entity framework core as its supports the async version of the methods to perform data operations.
We need to install the required entity framework packages. You run the below mentioned commands in Package Manager or install required Nuget packages from Nuget Package Manager.
Install-Package Microsoft.EntityFrameworkCore
Install-Package Microsoft.EntityFrameworkCore.Design
Install-Package Microsoft.EntityFrameworkCore.SqlServer
Install-Package Microsoft.EntityFrameworkCore.Tools
Add Database Entity
We will add the database entity class for the employee under DBEntities/EmployeeEntity.cs as per the code shown below
public class EmployeeEntity
{
    public int Id { get; set; }
    public string? FirstName { get; set; }
    public string? MiddleName { get; set; }
    public string? LastName { get; set; }
    public string? Designation { get; set; }
    public double Salary { get; set; }
}
Add Database Context
The database context class is the main class that coordinates Entity Framework operations for a given database entity class which is EmployeeEntity in this case. You need to derive the database context class from the entity framework DbContext class and specify the entities included in the Web API. This class creates a DbSet property for the Employee entity set. An entity set typically represents a database table and an entity represents a row in the table.
We will add the interface for the database context class for the employee entity under Interfaces/IApplicationDbContext.cs as per the code shown below
public interface IApplicationDbContext
{
    DbSet<EmployeeEntity>? Employees { get; set; }
    Task<int> SaveChanges();
}
We will add the database context class for the employee entity under DBContext/ApplicationDbContext.cs as per the code shown below
public class ApplicationDbContext : DbContext, IApplicationDbContext
{
    public ApplicationDbContext(DbContextOptions<ApplicationDbContext> options)
        : base(options)
    {
    }

    public DbSet<EmployeeEntity>? Employees { get; set; }

    public new async Task<int> SaveChanges()
    {
        return await base.SaveChangesAsync();
    }
}
The database table created will have the same name as the DbSet property name.
Add Connection String to appsettings.json file
Specify the SQL Server connection string in the appsettings.json file. We are using a local database (localdb) which is a lightweight version of the SQL Server Express database engine. Add below entry to appsetting.json file
"ConnectionStrings": {
  "DefaultConnection": "Server=(localdb)\\mssqllocaldb;Database=AsyncWebAPIDb;Trusted_Connection=True;MultipleActiveResultSets=true"
}
Register Database Context
You need to configure the database context as a service so that you can inject this DbContext service, using dependency injection, in the controller, or in any other service classes through the constructor parameter.
We can configure the database context as a service in the program.cs file as per the code shown below
var configuration = new ConfigurationBuilder()
               .SetBasePath(Directory.GetCurrentDirectory())
               .AddJsonFile("appsettings.json")
               .Build();

builder.Services.AddDbContext<ApplicationDbContext>(options =>
        options.UseSqlServer(
        configuration.GetConnectionString("DefaultConnection"),
        ef => ef.MigrationsAssembly(typeof(ApplicationDbContext).Assembly.FullName)));
builder.Services.AddScoped<IApplicationDbContext>(provider => provider.GetService<ApplicationDbContext>());
In the above code, we have also configured a configuration object to read the connection string from the appsettings.json file.
For more details on Dependency Injection, you can read my another article – https://procodeguide.com/programming/dependency-injection-in-asp-net-core-3/
Add Migrations
To automate the migrations from the entity framework classes we need to run the “add-migration” command and to create a database from the migrations we need to run the command “update-database” in the package manager console.
Run the below-mentioned commands in the package manager console
add-migration FirstMigration
update-database
The above commands will create the database on the database server specified in the connection string in the appsetting.json file and also create tables in the newly created database as per DbSet objects in DbContext
Now let’s add a controller for the employee entity. Since we won’t expose Database entities through the controller so will create a model first for employees and use that model in the employee controller.
Add Employee Model
Below is the class for Employee added in Models/Employee.cs
public class Employee
{
    public string? FirstName { get; set; }
    public string? MiddleName { get; set; }
    public string? LastName { get; set; }
    public string? Designation { get; set; }
}
Add Employee Service with async Get Method
Instead of adding an employee repository here for simplicity I have directly injected database context in the Employee service class and made use of that application database context to implement a method to get a list of all employees from the database.
We have added an interface for employee service in Interfaces/IEmployeeService.cs as per the code shown below
public interface IEmployeeService
{
    List<Employee> GetEmployees();
    Task<List<Employee>> GetEmployeesAsync();
}
We have added implementation for employee service in Services/EmployeeService.cs as per the code shown below
public class EmployeeService : IEmployeeService
{
    readonly IApplicationDbContext _applicationDbContext;

    public EmployeeService(IApplicationDbContext applicationDbContext)
    {
        _applicationDbContext = applicationDbContext;
    }

    public List<Employee> GetEmployees()
    {
        return AdaptEmployee(_applicationDbContext.Employees.ToList<EmployeeEntity>());
    }

    public async Task<List<Employee>> GetEmployeesAsync()
    {
        return AdaptEmployee(await _applicationDbContext.Employees.ToListAsync<EmployeeEntity>());
    }

    private static List<Employee> AdaptEmployee(List<EmployeeEntity> employeeEntityList)
    {
        List<Employee> employeeList = new();

        Employee? employee;

        foreach (EmployeeEntity employeeEntity in employeeEntityList)
        {
            employee = new()
            {
                FirstName = employeeEntity.FirstName,
                MiddleName = employeeEntity.MiddleName,
                LastName = employeeEntity.LastName,
                Designation = employeeEntity.Designation
            };
            employeeList.Add(employee);
        }
        return employeeList;
    }
}
In the above employee service code, we have added 2 methods to get a list of all employees from the database. One function without keyword async i.e. GetEmployee will run in synchronous mode i.e. thread will be blocked till database call completes.
Another function with the async keyword in definition and await in the body i.e. GetEmployeeAsync is an asynchronous version of method Get all employees i.e. thread will not be blocked instead thread will be free and available in thread pool to handle another request till this database call completes. Once this database call completes thread will be requested from the thread pool and execution will start from where the task was awaited.
Also in the async method, we made use of ToListAsync() method from Microsoft.EntityFrameworkCore namespace which is an async version synchronous ToList() method. The asynchronous ToListAsync() method serves the purpose to execute our query in an asynchronous mode.
With async methods don’t make use of the Result() & Wait() methods as that will block the thread till the operation completes and it will be against our purpose of writing async code for IO operations.
Also, we have registered this Employee service in the dependency container so that it can be injected into the controller using the constructor. To register employee service add the below line of code in the Program.cs file.
builder.Services.AddTransient<IEmployeeService, EmployeeService>();
Add Employee Controller with async Get Method
Here is the code for the Employee controller that has been added to expose the get action for all the Employees in the database. Employee Service has been injected as a constructor parameter using dependency injection. Implementation has been added by calling the methods in the employee service class.
The employee controller supports both synchronous and asynchronous action methods using the synchronous and asynchronous methods available in employee service to get the list of all employees from the database.
[Route("api/[controller]")]
[ApiController]
public class EmployeeController : ControllerBase
{
    readonly IEmployeeService? _employeeService;

    public EmployeeController(IEmployeeService employeeService)
    {
        _employeeService = employeeService;
    }

    // POST api/<EmployeeController>
    [HttpGet("GetEmployees")]
    public List<Employee> GetEmployees()
    {
        return _employeeService.GetEmployees();
    }

    // POST api/<EmployeeController>
    [HttpGet("GetEmployeesAsync")]
    public async Task<List<Employee>> GetEmployeesAsync()
    {
        return await _employeeService.GetEmployeesAsync();
    }
}
We have used await inside the async action method as this await keyword will help us to extract the result from the operation for which await is used. After this result is obtained it will validate this result for success or failure and after the result is validated it will continue the code execution i.e. it will execute the statement after awaited statement.
In a single async method, we can have more than one await statement. One or more await statements will depend on the logic inside the method.
So far we looked at how to create an async web API with ASP.NET Core now let’s test this code.
Let’s run and test the code
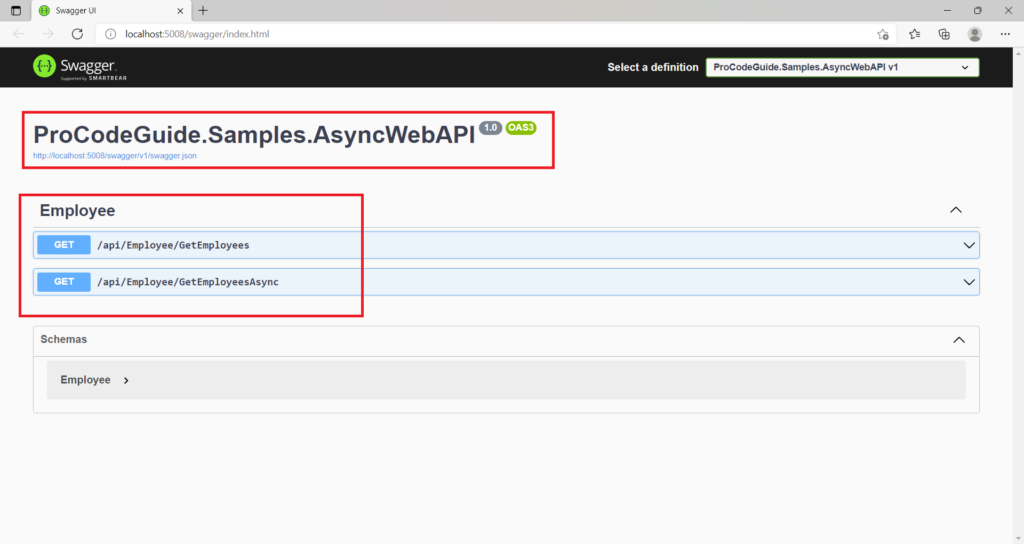
We have enabled Open API Swagger for the Web API and we will be using the same to test our actions methods of Employee Controller
After running the application code you should see below screen
Test Synchronous Get Method
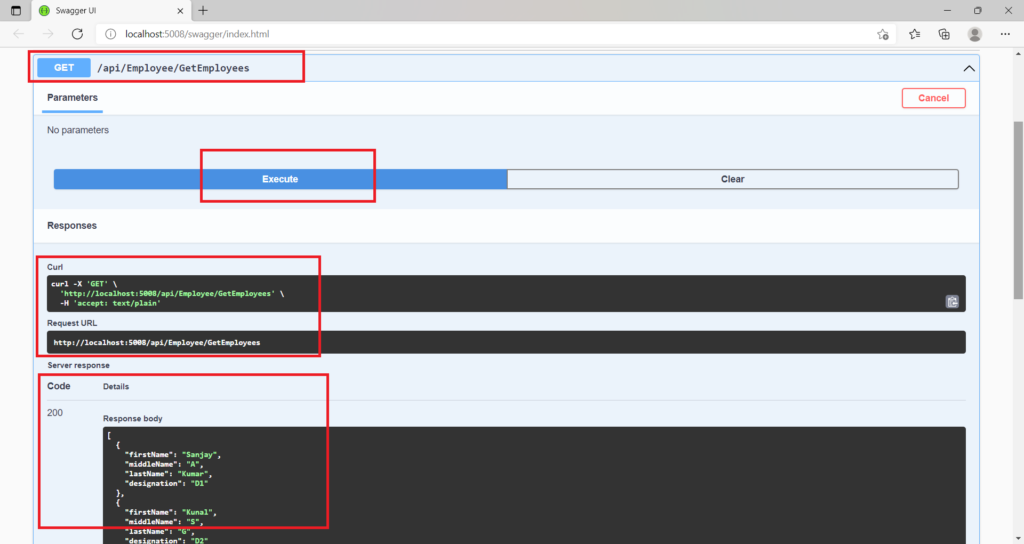
Below are the results from the synchronous implementation of getting Employees action Method (GetEmployees)
Test Asynchronous Get Method
Below are the results from the asynchronous implementation of getting Employees action Method (GetEmployeesAsync)
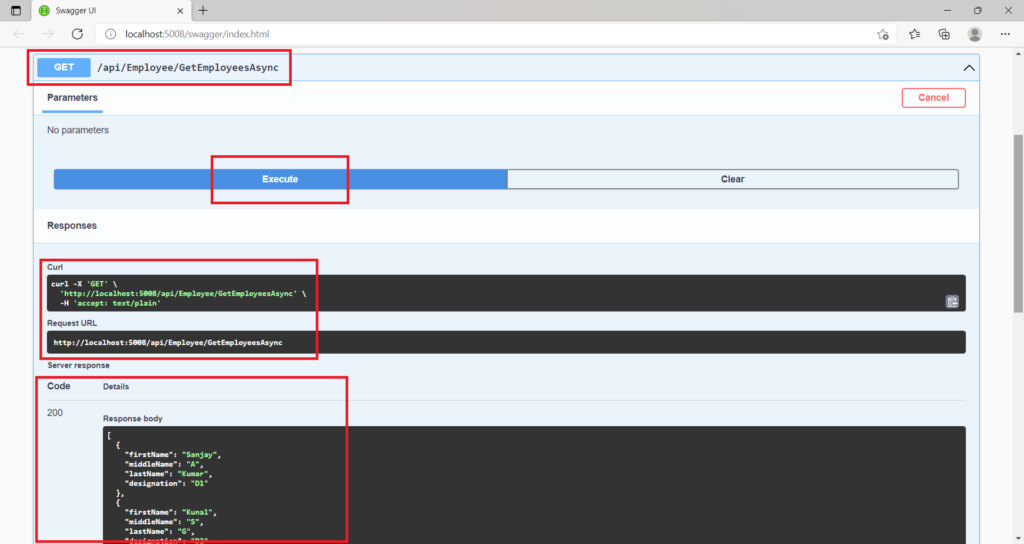
Both methods fetched the same results but will vary in performance under load conditions.
Exception Handling in async Method
In the async method, we use await and this await keyword helps to only avoid blocking of thread till the awaited operation (Task) completes and then it will call the next statement after the awaited operation has completed. So it is like a normal code execution and we can wrap the code in a try-catch block to handle exceptions.
public async Task<List<Employee>> GetEmployeesAsync()
{
    try
    {
        return await _employeeService.GetEmployeesAsync();
    }
    catch(Exception ex)
    {
        //Log the exception
        return null;
    }
}
After we run our code, the await keyword will validate the operation after we get the result from the operation, and as soon as it notices that the operation has thrown an exception then that exception will be handled and the code will continue execution inside the catch block.
Summary
We learned about how to implement async Web API with ASP.NET Core using async and await keywords. Asynchronous Web API improves the stability of the application i.e. application is able to handle more requests and indirectly improves the performance of the application as well.
We used Entity Framework Core as it supports many asynchronous functions to implement database operations for the given database entity.
If you have still not read my detailed article on Asynchronous Programming in .NET Core C# – using async & await then I recommend you read the same here
Please provide your suggestions & questions in the comments section below
You can check my other trending articles – Build Resilient Microservices (Web API) using Polly in ASP.NET Core & Microservices with ASP.NET Core 3.1 – Ultimate Detailed Guide
Download Source Code
Here you can download the complete source code for this article demonstrating how to create async Web API with ASP.NET Core
https://github.com/procodeguide/ProCodeGuide.Samples.AsyncWebAPI
Hope you found this article useful. Please support the Author

