In this article, we will learn about what are feature flags their use along with benefits and how to use these feature flags in the ASP.NET Core application. We will also explore how we can make use of available feature filters to enable or disable features in the ASP.NET Core application.
We will be implementing Microsoft Feature Management i.e. feature flags in ASP.NET Core C# application but all this is applicable to other types of .NET C# based applications as well.
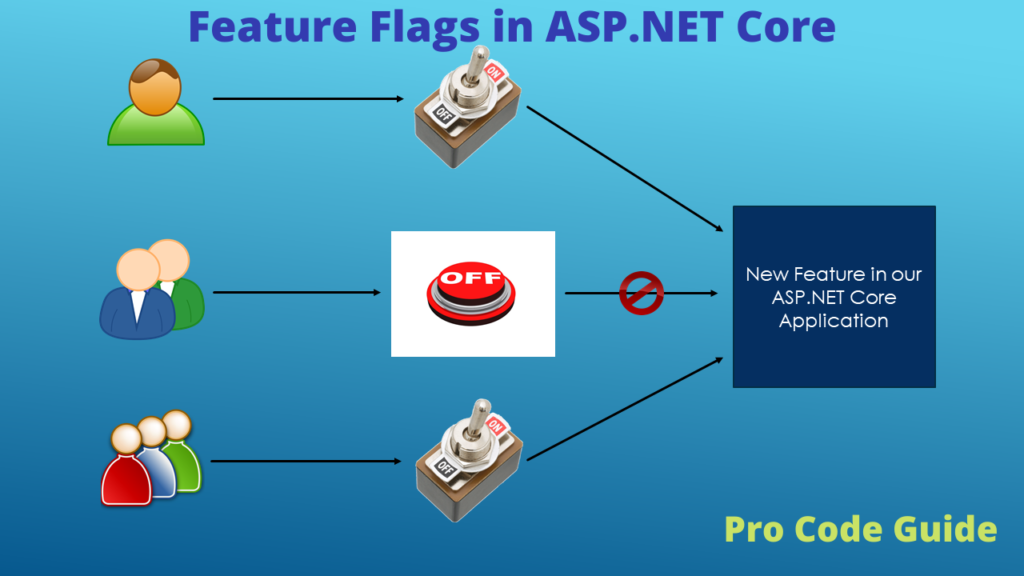
Table of Contents
Feature Flags Overview
Feature flags in ASP.NET Core allow us to change application behaviour i.e. enable or disable a specific functionality in the application at runtime without the need to make code changes or deploy a new version of the application. Feature flags are like a feature toggler that allows us to enable or disable a feature in an application in production.
Consider that you have just released a new feature on production for allowing users to generate an invoice for their order. But you found out that this new feature is not working correctly as it is not printing the customer name correctly in the invoice. So quickly with help of the feature flag, you can disable this feature without changing code or deploying a new version of the application. This feature can be disabled on production till the time you work out a fix & deploy that on production.
So you can enable or disable a feature in the production at runtime without code changes and deployment & also quickly rollback a feature that has gone wrong on production without the need to roll back the deployment
Feature flags also allow you to gradually release a feature to the users i.e. first you can enable a new feature for just a few users of the application to check how it performs and once you are assured that it works as expected then you can enable this feature for remaining users either all at once or again gradually.
You can also selectively enable or disable a feature in the application based on browser type, users, etc. If you have a feature that uses javascript supported only in chrome then you can make that feature enabled for chrome and disabled for all other browsers except chrome browser. You can even enable a feature for a specific user(s) or for a group of users.
You can also use feature flags to support the Beta programs of your application. As part of the Beta program, you can enable new features only for users who have opted for the Beta version of the application. Once new features are tested thoroughly then you can enable features in the Beta program for all the users.
Many a time when you start working on new features in your application then you create a new feature branch for your source code so that it doesn’t impact your version of the application running on production. You build & test this feature separately and when it’s ready you merge it into your main branch. Feature flags can reduce the overhead of branching and merge for the development of features. You can develop a feature as part of your main branch and keep it disabled till it’s fully developed and tested.
Introduction to Microsoft Feature Management
The Microsoft feature management is a library provided by Microsoft for feature flags implementation in .NET and .NET Core based applications. This library allows you to add feature flags declaratively so that there is no need for you to manually write code to enable or disable features with if statement.
The Microsoft feature management library also helps to manage feature flags life cycle i.e. library refresh flag status and also caches them in memory or also can guarantees that a flag state remains constant during a request or session.
Microsoft feature management library makes it possible to decouple the feature launches with the deployment of the code i.e. you can deploy all the new features together on production in a disabled state and you can enable those features as when and when required without further deployments.
Microsoft feature management library for ASP.NET Core also provides support for MVC controllers, views, actions, routes, and middleware.
Microsoft Feature Management provides the following features
- Allows to enable or disable a feature at runtime on the production
- Feature flag configuration management either locally or remotely on Azure
- Provides support for ASP.NET Core Filters so that logic for enabling & disabling can be extended beyond flag state.
- Flag state management to ensure that even if the feature flag is toggled at runtime it does not change for the request that is running or the user sessions which are active i.e. feature state should toggle only for new requests or new user sessions.
Implementation of Feature Flags in ASP.NET Core Applications
For demonstrations in this article, we will be using Visual Studio Community 2022 17.0.5 with .NET 6
Overall Approach for demonstration
- We will first create an ASP.NET Core Web App and name it as ProCodeGuide.Samples.FeatureFlagsDemo
- We will then add Mobile Review Functionality/Feature to the MVC Application i.e. Page to view a list of mobiles with a rating for each mobile and for each mobile there will also be a link to check details of that mobile.
- Next, we will enable a feature flag for this Mobile Review Functionality so that we are able to learn how to configure feature flags in ASP.NET Core for the features being added.
- Finally, we will explore and understand the different options available in Microsoft Feature Management Library for feature flags in ASP.NET Core
Here is a quick and short video on how to implement feature flags in ASP.NET Core
Create ASP.NET Core Web App Project
Create a new project of type ASP.NET Core Web App (MVC) as per the screenshots shown below with the name as ProCodeGuide.Samples.FeatureFlagsDemo
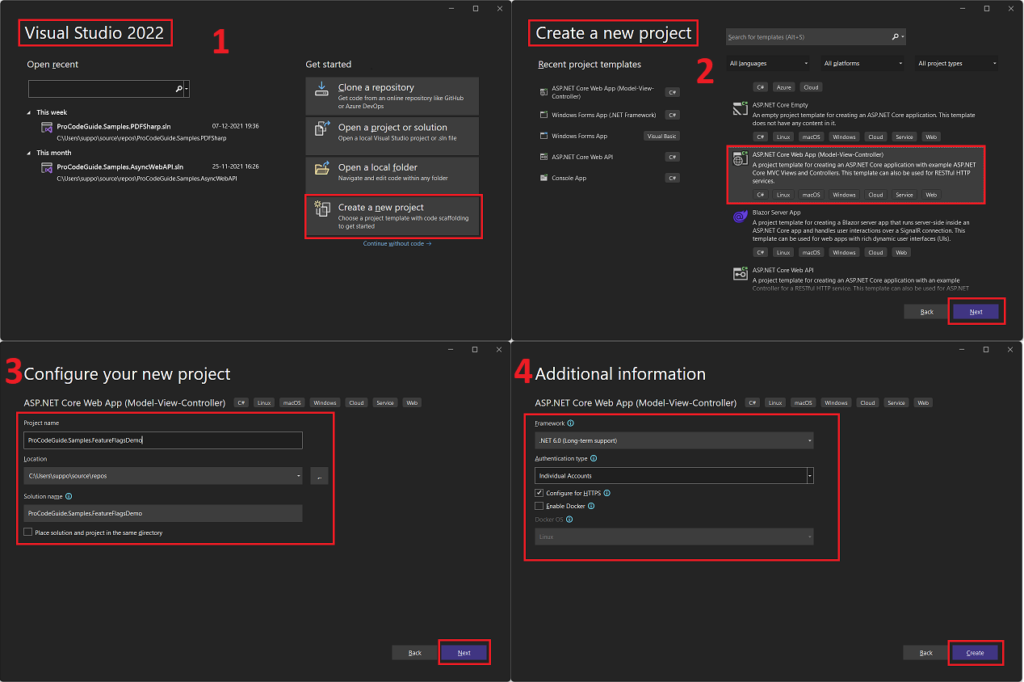
Please note that on the Additional Information screen I have selected authentication type as ‘Individual Accounts’ this will add Identity support to the applications for creating users and login functionality to create sessions.
Add a new Feature to the Application
Now that we have created the project for demonstration let’s add some functionality i.e. features so that we are able to see how to configure feature flags in ASP.NET Core.
For demonstration purposes, we will add a mobile review feature to this application. We will add a high-level menu ‘Mobile Reviews’ clicking on which it will display a list of mobiles with the rating for each mobile and also for each mobile there will be a link to check the details of that mobile.
So let’s get started to build our feature first and then we will add a feature flag to it.
Add Models
We will first add models that will hold the data for the list of mobiles and another model for the detailed review of the mobile. We will add models under Models\MobileReview.cs & Models\Mobile.cs as shown in the code below
public class MobileReview
{
    public string? Rating { set; get; }
    public string? Remarks { set; get; }
}
public class Mobile
{
    public string? Id { set; get; }
    public string? Name { set; get; }
    public string? Specfication { set; get; }
    public MobileReview? ReviewDetails { set; get; }
}
Add Data Service
Now that we have created our Models to hold data we need data to populate into these modules that will be displayed in our demo application. Since this is a demo application we will hard code the dummy data in the code itself so that we don’t waste much time around wiring the data.
To generate data we will create a dummy data service that returns the hardcoded data. In reality, this service should fetch data from the database and return that but we will keep things simple for this demo. We will add Interfaces\IMobileDataService.cs & Services\DummyMobileDataService.cs as per the code shown below
public interface IMobileDataService
{
    List<Mobile> GetAllMobileReviews();
}
public class DummyMobileDataService : IMobileDataService
{
    public List<Mobile> GetAllMobileReviews()
    {
        List<Mobile> mobileReviews = new();

        mobileReviews.Add(PrepareMobileObject("1", "iPhone 12", "6.1 inch Display Screen", "2 Star", "Old Model - Current Model is 13"));
        mobileReviews.Add(PrepareMobileObject("2", "iPhone 13 Mini", "5.4 inch Display Screen", "3 Star", "Small Display - Bigger Display Available"));
        mobileReviews.Add(PrepareMobileObject("3", "iPhone 13", "6.1 inch Display Screen", "3 Star", "Decent Diaplay Size but other models with better camera options available"));
        mobileReviews.Add(PrepareMobileObject("4", "iPhone 13 Pro", "6.1 inch Display Screen", "4 Star", "Good Display Size and best camera but other models with bigger display available"));
        mobileReviews.Add(PrepareMobileObject("5", "iPhone 13 Pro Max", "6.7 inch Display Screen", "5 Star", "Good display size and best camera"));
        return mobileReviews;
    }

    private Mobile PrepareMobileObject(string Id, string Name, string Specification, string Rating, string Remarks)
    {
        return (new Mobile
        {
            Id = Id,
            Name = Name,
            Specfication = Specification,
            ReviewDetails = new MobileReview
            {
                Rating = Rating,
                Remarks = Remarks
            }
        });
    }
}
In the above dummy service, we are returning the list of Mobiles and each Mobile instance is populated with the hardcoded data required for the demo.
Now that we have added a dummy data service we will register this service in the dependency container so that it can be injected into the controller using the constructor. To register the service add the below line of code in the Program.cs file.
builder.Services.AddTransient<IMobileDataService, DummyMobileDataService>();
Add Controller
Next, we will add the MVC controller for the Mobile to handle actions for our view pages i.e. a mobile list with a rating & detailed mobile review page. We will add a controller under Controllers\MobileController.cs as per the code shown below
[Authorize]
public class MobileController : Controller
{
    private readonly IMobileDataService _mobileDataService;

    public MobileController(IMobileDataService mobileDataService)
    {
        _mobileDataService = mobileDataService;
    }

    public IActionResult Index()
    {
        List<Mobile> mobiles = _mobileDataService.GetAllMobileReviews();
        return View(mobiles);
    }

    public IActionResult ReviewDetails(string? id)
    {
        Mobile? mobile = _mobileDataService.GetAllMobileReviews().Find(p => p.Id.Equals(id));
        return View(mobile);
    }
}
In the above controller, we have added two actions Index to handle the main mobile review page that will display the list of mobile with review and ReviewDetails that to handle detailed mobile review page that will display details of one mobile at a time.
The above Controller is with Authorize attribute so you will have to create a user and login with that user to be able to get access to execute actions on the controller.
Add Views
So far we have added models, data service & controller so now it’s time to add the required views and wire them all together so that we get a working prototype for demonstration of feature flags in ASP.NET Core.
1st View – We will add the main view display the list of mobiles with the rating of each mobile under Views\Mobile\Index.cshtml as per the code shown below
@model List<Mobile>
@{
    ViewData["Title"] = "View All Mobiles Review";
}
<h1>@ViewData["Title"]</h1>

<table class="table table-responsive table-hover">
    <tr>
        <td>Id</td>
        <td>Name</td>
        <td>Specification</td>
        <td>Rating</td>
        <td>Review Details</td>
    </tr>
    @foreach (Mobile mobile in Model)
    {
        <tr>
            <td>@mobile.Id</td>
            <td>@mobile.Name</td>
            <td>@mobile.Specfication</td>
            <td>@mobile.ReviewDetails.Rating</td>
            <td>@Html.ActionLink("Click Here", "ReviewDetails", new { id = mobile.Id })</td>
        </tr>
    }
</table>
The above view will display the list of mobiles and for each mobile, there will be a link to view the detailed review of that mobile.
2nd View – We will add the 2nd view to display the detailed review of each mobile under Views\Mobile\ReviewDetails.cshtml as per the code shown below
@model Mobile
@{
    ViewData["Title"] = "Mobile Detailed Review";
}
<h1>@ViewData["Title"]</h1>

<br />

<table class="table table-responsive table-hover">
    <tr>
        <td><span style="font-weight:bold">Id</span></td>
        <td>@Model.Id</td>
    </tr>
    <tr>
        <td><span style="font-weight:bold">Name</span></td>
        <td>@Model.Name</td>
    </tr>
    <tr>
        <td><span style="font-weight:bold">Specfications</span></td>
        <td>@Model.Specfication</td>
    </tr>
    <tr>
        <td><span style="font-weight:bold">Rating</span></td>
        <td>@Model.ReviewDetails.Rating</td>
    </tr>
    <tr>
        <td><span style="font-weight:bold">Review</span></td>
        <td>@Model.ReviewDetails.Remarks</td>
    </tr>
</table>
Next, we will add the menu item in the application for Mobile Review and clicking on this menu item will take us to the Index page of Mobile Controller i.e. Main page for Mobile Review. For menu item below code has been added in Views/Shared/_Layout.cshtml with <ul> element.
<li class="nav-item">
    <a class="nav-link text-dark" asp-area="" asp-controller="Mobile" asp-action="Index">Mobile Reviews</a>
</li>
Add Migrations
Since we have selected Identity as part of the application we need to automate migrations and also create a database so we need to run the “add-migration” command and to create a database from the migrations we need to run the command “update-database” in the package manager console.
Run the below-mentioned commands in the package manager console
add-migration FirstMigration
update-database
Now after running the code we should be able to see the below screen
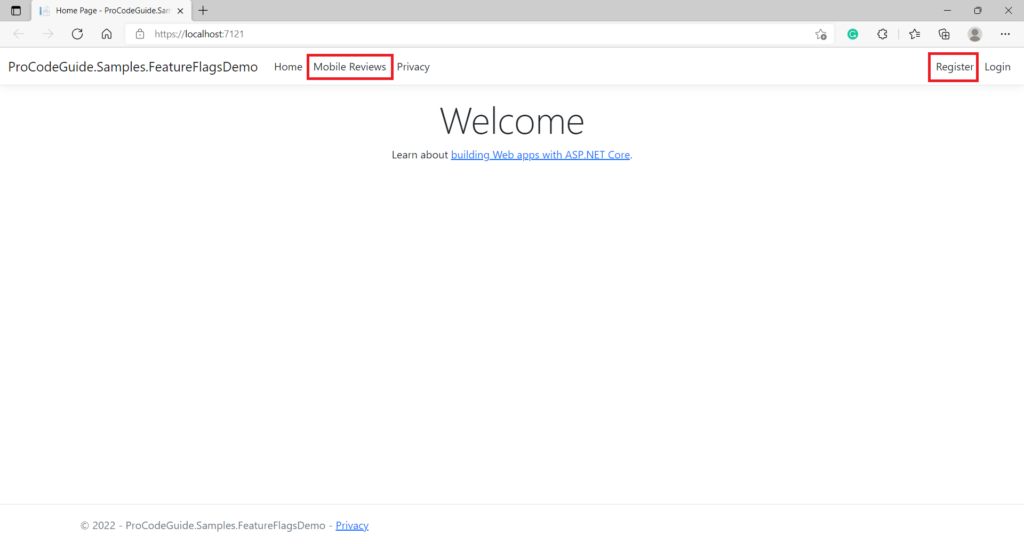
In the above screen, you can see the mobile reviews menu that we added in _Layout,cshtml. If you try to click on this menu then you will be taken to the login screen. So you need to register a new user first and then login with that user to navigate to the mobile review screen that is shown below
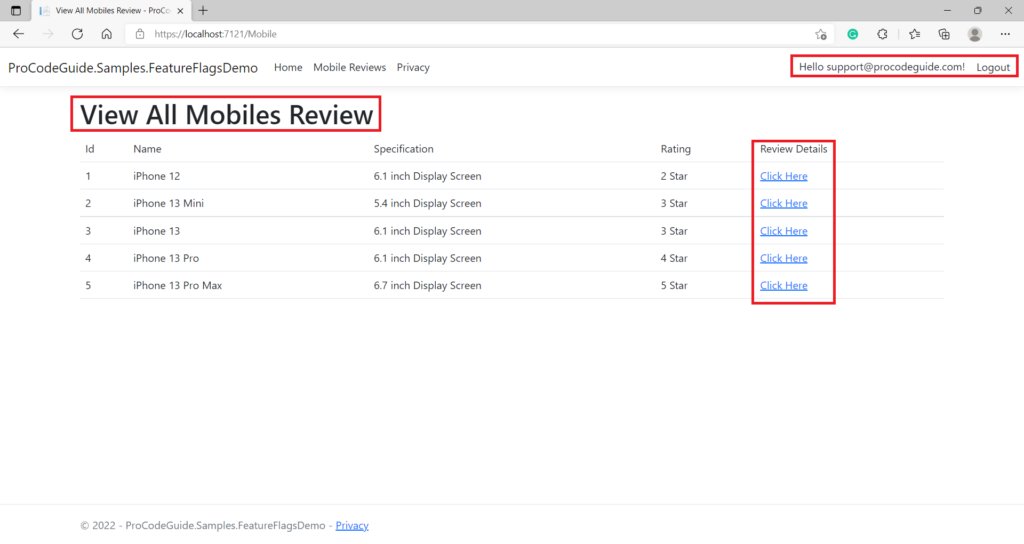
In the above screen, we can see a list of mobiles with dummy ratings for each mobile. There is also a link against each mobile to view the detailed review and after clicking on this link you will be taken to the below screen
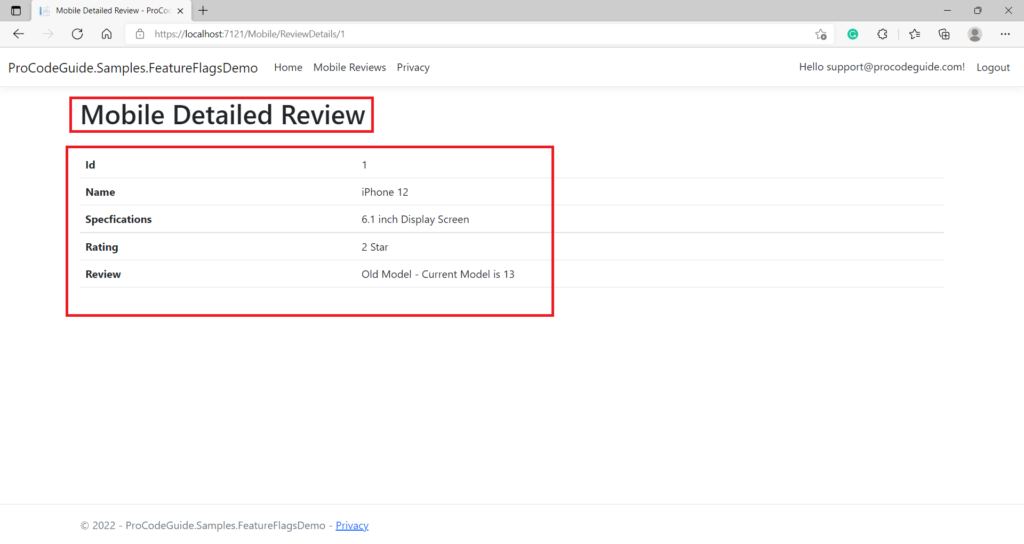
In the above screen, we can see a dummy detailed review of each mobile.
Now that we have coded for the new feature and our code is ready with the required functionality for release. But Management has decided to launch this feature at a later date. So instead of reverting the feature, we decided that we will introduce a feature flag for this feature and release our code with the flag set to false so that this feature i.e. new menu option won’t be visible to the users.
Actually, we should have added a feature flag along with the feature development itself but for demonstration purposes so that we clearly understand how to configure feature flags in ASP.NET Core I didn’t introduce a feature flag while coding for the feature. So let’s now understand how to configure feature flags in ASP.NET Core for the application for this new feature.
Configure Feature Flags for the new Feature
To configure feature flags in ASP.NET Core you need first add the reference for package Microsoft.FeatureManagement.AspNetCore in the Application.
Install required packages
You can add the Microsoft Feature Management package by running the below-mentioned command in the Package Manager Console window
Install-Package Microsoft.FeatureManagement.AspNetCore -Version 2.4.0
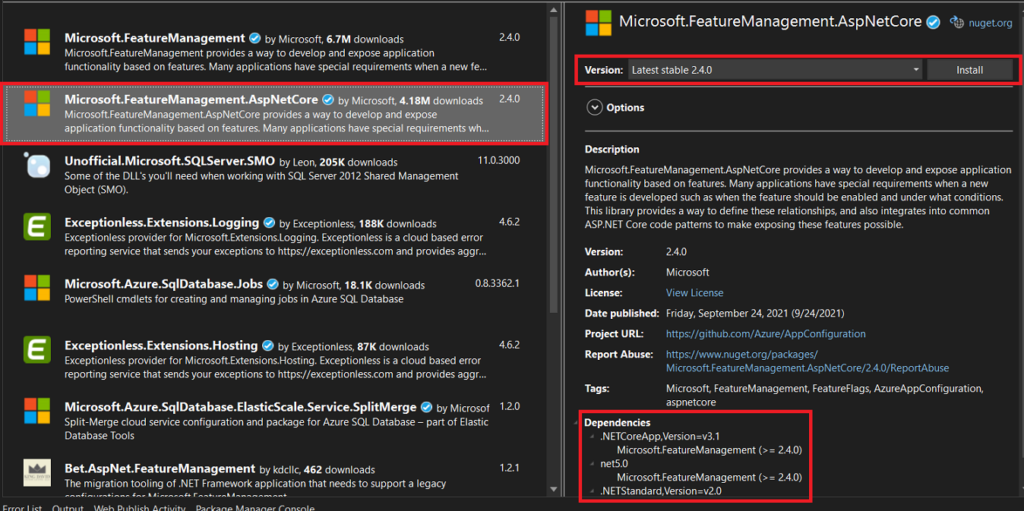
As we can see from the above screen Microsoft.FeatureManagment.AspNetCore has a dependency on Microsoft.FeatureManagement package so it will install this package as well.
Configure Feature Management in Application
Now that we have the package installed in the ASP.NET Core application we need to configure it in our application. For configuration, we added the below line of code in Program.cs
builder.Services.AddFeatureManagement();
The above line of code will add the required services for feature management in the ASP.NET Core application. By default feature management service will look for feature flags in ASP.NET Core in the appsettings.json file so we need to add the feature management section in the appsettings.json file as shown below.
"FeatureManagement": {
    "MobileReview": false,
    "MobileDetailedReview": false
  }
Under the Feature Management section in the appsettings.json file, we have added a couple of feature flags i.e. MobileReview & MobileDetailedReview for the 2 views which we added in our application for Mobile Reviews. Please note that we have added both the feature flags as disabled i.e. value is set to false.
Also, we will add the constants for the feature flags added above in the form of enum in our application so that we don’t need to hardcode feature flag names in our application. The name of the feature flag in appsettings.json should match the name of the constant in the enum.
Below enum has been added in under Models\FeatureFlags.cs
public enum FeatureFlags
{
    MobileReview,
    MobileDetailedReview
}
Now that we have done the required configuration of Feature Management in our applications let’s see how we can make use of feature management services in the controller.
Make use of Feature Flags in Controller
To enable feature flags in ASP.NET Core in the controller we can make use of the Feature Management attribute FeatureGate. We can use this attribute either for a particular action or at the controller level i.e. for all the actions controller.
The FeatureGate attribute takes the name of the feature flag set in the appsettings.json file as an input string parameter. Applying the FeatureGate attribute will enable or disable an action(s) based on the feature flag value set to true or false in the appsettings.json file.
We have applied the FeatureGate attribute to the Mobile Controller (flag name MobileReview) and to action ReviewDetails (flag name MobileDetailedReview) as shown in the code below.
[Authorize]
[FeatureGate(nameof(FeatureFlags.MobileReview))]
public class MobileController : Controller
{
    private readonly IMobileDataService _mobileDataService;

    public MobileController(IMobileDataService mobileDataService)
    {
        _mobileDataService = mobileDataService;
    }

    public IActionResult Index()
    {
        List<Mobile> mobiles = _mobileDataService.GetAllMobileReviews();
        return View(mobiles);
    }

    [FeatureGate(nameof(FeatureFlags.MobileDetailedReview))]
    public IActionResult ReviewDetails(string? id)
    {
        Mobile? mobile = _mobileDataService.GetAllMobileReviews().Find(p => p.Id.Equals(id));
        return View(mobile);
    }
}
As per the above code, the controller will be disabled (including all actions) if the feature flag MobileReview in the appsettings.json file is set to false and if the feature flag MobileReview is true then all actions will be available except action ReviewDetails as that is again dependent on feature flag MobileDetailedReview i.e. action ReviewDetails will not be available if the feature flag MobileDetailedReview is set to false.
In the appsettings.json file both the feature flags are set to false so now let’s run the code and check the results. After running the code and navigating to menu mobile review (after login) we will get below screen

We got the above error as we tried to view the mobile review screen but the mobile controller is not available as the feature flag MobileReview is set to false.
You can try enabling the features by setting the feature flag to true in the appsettings.json file and you can see that your code works fine i.e. new features are available and everything is working as expected. But do remember to again set the feature flags to false for the continuity of this demonstration.
The default behaviour of Microsoft Feature Management services is to display this error when any disabled action has been accessed by the user. Let’s see how we can override this default behaviour i.e. instead of displaying an error we display a friendly message to the user.
Implement Disabled Feature Handler
To override the behaviour that happens when action is called but action is disabled by the feature flag then in that case you need to create a new class that implements the IDisabledFeaturesHandler interface and then register that new class in the Program.cs file with feature management services.
We have added the below class under Handlers\CustomDisabledFeatureHandler.cs that implements the IDisabledFeaturesHandler interface and implements the function HandleDisabledFeatures from the interface
public class CustomDisabledFeatureHandler : IDisabledFeaturesHandler
{
    public Task HandleDisabledFeatures(IEnumerable<string> features, ActionExecutingContext context)
    {
        context.Result = new ContentResult
        {
            ContentType = "text/plain",
            Content = "This feature is not available please try again later - " + String.Join(',',features),
            StatusCode = 404
        };
        return Task.CompletedTask;
    }
}
As you can see in the above code in the function to override disabled feature behaviour we are returning the response as plain text with a message and have also appended the message with the disabled feature flag name that has been invoked
Now that we have added the class we need to register this in the program.cs file. You can register this class as a feature management service by adding the below code in the program.cs file.
builder.Services.AddFeatureManagement()
                .UseDisabledFeaturesHandler(new CustomDisabledFeatureHandler());
The above code will register class CustomDisabledFeatureHandler as a handler for disabled feature i.e. this class method will be invoked when a user tries to access action that is disabled by feature flag set to false.
Now after running the code and navigating to menu mobile review (after login) we will get below screen

As seen in the above screen still feature is disabled but instead of getting an error what is received as the response is the message that we code in the disabled feature handler along with the feature name i.e. MobileReview.
This overriding of the behaviour so that the user does not receive an error instead get a friendly message is fine. But in the first place, if features flags are set to false then the user should not be allowed to click on the mobile review menu or detailed mobile review link i.e. either this menu & link should not be visible and if they are visible then they should not be clickable.
Now let’s see how we can make use of the feature flags in ASP.NET Core in views so that menu and link is not visible to the user when features are disabled i.e. features flags for MobileReview and MobileDetailedReview are set to false.
Make use of Feature Flags in Views
The package Microsoft.FeatureManagement.AspNetCore also provides support for custom TagHelpers that can be used in the application to implement feature flags in ASP.NET Core by conditionally rendering the HTML content.
To start using Tag Helpers first you need to add the feature management tag helpers. We have added the below line of code in the Views/_ViewImports.cshtml file to add the feature management tag helpers in our application.
@addTagHelper *, Microsoft.FeatureManagement.AspNetCore
Now we can make use of feature management tag helpers to conditional render HTML content.
The first change we have to make is for the menu item mobile reviews i.e. display or render that menu only if the feature flag is set to true i.e. feature is enabled. For this, we will make use of <feature></feature> tag helper and surround the menu item around the feature tag helper. In the feature tag helper, we will have to specify the name of the feature to which it is linked.
We have made below code changes in Views/Shared/_Layout.cshtml to wrap the menu item within the feature tag helper and also specified the name of the feature flag in the tag helper
<feature name="@nameof(FeatureFlags.MobileReview)">
    <li class="nav-item">
        <a class="nav-link text-dark" asp-area="" asp-controller="Mobile" asp-action="Index">Mobile Reviews</a>
    </li>
</feature>
The second change we have to make is for the link for detailed mobile review i.e. display or render that link only if the feature flag is set to true i.e. feature is enabled.
We have made below code changes in Views/Mobile/Index.cshtml to wrap the link within the feature tag helper and also specified the name of the feature flag in the tag helper
<table class="table table-responsive table-hover">
    <tr>
        <td>Id</td>
        <td>Name</td>
        <td>Specification</td>
        <td>Rating</td>
        <feature name="@nameof(FeatureFlags.MobileDetailedReview)">
            <td>Review Details</td>
        </feature>
    </tr>
    @foreach (Mobile mobile in Model)
    {
        <tr>
            <td>@mobile.Id</td>
            <td>@mobile.Name</td>
            <td>@mobile.Specfication</td>
            <td>@mobile.ReviewDetails.Rating</td>
            <feature name="@nameof(FeatureFlags.MobileDetailedReview)">
                <td>@Html.ActionLink("Click Here", "ReviewDetails", new { id = mobile.Id })</td>
            </feature>
        </tr>
    }
</table>
The above changes will not display the menu item for the mobile review page and link for the detailed mobile review page if the corresponding feature flags are set to false in the appsettings.json file.
You can compile & run the code to verify that the above changes in views using feature management tag helpers is providing the desired results.
Feature Flag as a Progam Parameter in Controller & View
So far we saw how to use attributes and tag helpers provided in the feature management package to disable controller/actions and control the rendering of HTML content based on feature flags value. But what happens if you don’t have an option to disable action as that action already exists on production and you are just making some logical change in the existing action that you want to control based on the feature flags.
For example, you have an action in which some calculations are being done but now you need to change the existing calculation logic but you want to do that based on the feature flag i.e. if a newlogic feature is enabled new logic for calculation will be used else old calculation logic will be used instead.
For this, we will have to programmatically query feature flags in ASP.NET Core in the controller so that we can access the feature flag value in the controller and then from the controller if required pass it to other components like services, views, etc. The feature management has provided the FeatureManager service which can be accessed using interface IFeatureManager using dependency injection in ASP.NET Core.
It is possible to change the value of the feature flag in the appsettings.json file without the need to restart the application and the new changed value will start reflecting in the application. But this can result in inconsistent behaviour within your application. For example, if in an action you are checking feature flag value at multiple places then it is quite possible that if you change the value of the feature flag on the fly then the value might change within a request itself so to avoid this issue you can make use of IFeatureManagerSnapshot interface instead of IFeatureManager. As the name suggests IFeatureManagerSnapshot will provide a snapshot that will be consistent during a single request
To access the feature flag value in the controller we will make the following code changes to the Controllers/HomeController.cs file
public class HomeController : Controller
{
    private readonly ILogger<HomeController> _logger;
    private readonly IFeatureManager _featureManager;

    public HomeController(ILogger<HomeController> logger, IFeatureManager featureManager)
    {
        _logger = logger;
        _featureManager = featureManager;
    }

    public async Task<IActionResult> Index()
    {
        if (await _featureManager.IsEnabledAsync(nameof(FeatureFlags.MobileReview)))
        {
            ViewData["WelcomeMessage"] = "Welcome - Mobile Review Application";
        }
        else
        {
            ViewData["WelcomeMessage"] = "Welcome";
        }
        return View();
    }

    //Remaining Code has been removed for readability
}
In the above code, we are querying the value for feature flag MobileReview using the FeatureManager service provided by the Feature management package to query feature flags in ASP.NET Core. Based on the value of the feature flag we are altering the welcome message that is being displayed to the users.
To display the welcome message provided by the controller we have made the following code changes in the Views/Home/Index.cshtml file.
@{
    ViewData["Title"] = "Home Page";
}

<div class="text-center">
    <h1 class="display-4">@ViewData["WelcomeMessage"]</h1>
    <p>Learn about <a href="https://docs.microsoft.com/aspnet/core">building Web apps with ASP.NET Core</a>.</p>
</div>
As we have passed the welcome message to the view you can even pass the feature flag directly to view to conditionally render HTML based on the feature flag value.
You can compile & run the code to verify that the above changes are providing the desired results.
Combining Multiple Feature Flags
You can also configure multiple feature flags in ASP.NET Core for the FeatureGate attribute in the controller and feature tag in the view. The feature names should be comma-separated and you can also specify the condition for multiple feature flags in ASP.NET Core i.e. All (and) or Any (or).
Below are examples about how to specify multiple feature flags in ASP.NET Core for the FeatureGate attribute in the controller and feature tag in the view
[FeatureGate(Microsoft.FeatureManagement.RequirementType.Any, nameof(FeatureFlags.MobileReview), nameof(FeatureFlags.MobileDetailedReview))]
public IActionResult ReviewDetails(string? id)
{
    Mobile? mobile = _mobileDataService.GetAllMobileReviews().Find(p => p.Id.Equals(id));
    return View(mobile);
}
<feature name="@nameof(FeatureFlags.MobileDetailedReview),@nameof(FeatureFlags.MobileReview)" requirement=All>
    <td>@Html.ActionLink("Click Here", "ReviewDetails", new { id = mobile.Id })</td>
</feature>
Feature Filters for Feature Flags in ASP.NET Core
Until now we just used the value (true or false) of the feature flag to determine whether the feature should be enabled or disabled. Now if you want to go beyond the value of the feature flag and implement some extra logic (based on users, groups, percentage of requests, etc) for feature enabling and disabling then this is where Feature Filters come into the picture.
You can specify the optional feature filter for any feature flag. When a feature flag value is accessed then Microsoft Feature Management will access its configuration in the appsettings.json file and if it finds the configuration for feature filter for that feature then it will instantiate the instance of the feature filter. Once the instance of the feature filter is instantiated then it will look for the configuration values for the feature filter and based on the logic of that feature filter the value for the feature flag either true or false is determined.
Before you can use feature filter in the configuration it should be registered in the application in Program.cs file. There are inbuilt feature filters provided by the Microsoft Feature Management package for ASP.NET Core but you can even write your own custom feature filters.
Using Percentage Filter
This percentage filter will enable a feature for the specified percentage of requests. i.e. a value of 50 will enable the feature for 50% of the requests and for the other 50% it will be disabled.
This filter can be used when you are releasing a new feature but don’t want to enable it all at once ie. you want to release a feature gradually. Initially, you keep the percentage small like 1-5% and after checking the results and response you can increase the percentage slowly. You can even use this percentage filter for randomised A/B testing.
As explained you need to first register the feature filter in the application before you can use that in the configuration. Below is the code to register Percentage Filter in the application in the Program.cs file.
builder.Services.AddFeatureManagement()
                .UseDisabledFeaturesHandler(new CustomDisabledFeatureHandler())
                .AddFeatureFilter<PercentageFilter>();
Once the feature filter is registered you can use that filter in the configuration in the appsettings.json file. Below is the configuration for percentage filter with a value of 50%
"FeatureManagement": {
  "MobileReview": {
    "EnabledFor": [
      {
        "Name": "Microsoft.Percentage",
        "Parameters": {
          "Value": 50
        }
      }
    ]
  },
  "MobileDetailedReview": true
}
The above configuration will enable the MobileReview feature for 50% of the requests that are handled by the application.
You can compile & run the code to verify that the above changes are providing the desired results or not. After running if you perform a frequent refresh on the home page then you can observe that the menu Mobile Review is not available always instead it’s visible for some requests and for others it is not visible.
Using Time Window Feature
This time window filter will enable a feature from the start date-time specified to the end date time specified i.e. it will enable for the datetime range specified. If you specify only start date-time but no end date time then this feature will be enabled at start date-time and will never get disabled.
This time window feature filter is useful for time-bound features i.e. features that should get enabled at a specific date time and be disabled at a specific date-time like a weekend sale, festival sale, etc.
As explained you need to first register the feature filter in the application before you can use that in the configuration. Below is the code to register Time Window Filter in the application in the Program.cs file.
builder.Services.AddFeatureManagement()
                .UseDisabledFeaturesHandler(new CustomDisabledFeatureHandler())
                .AddFeatureFilter<PercentageFilter>()
                .AddFeatureFilter<TimeWindowFilter>();
Once the feature filter is registered you can use that filter in the configuration in the appsettings.json file. Below is the configuration for Time Window filter with Start as 26th Jan 2022 06:00 AM and End as 26th Jan 2022 06:00 PM
"FeatureManagement": {
  "MobileReview": {
    "EnabledFor": [
      {
        "Name": "Microsoft.Percentage",
        "Parameters": {
          "Value": 50
        }
      }
    ]
  },
  "MobileDetailedReview": {
    "EnabledFor": [
      {
        "Name": "Microsoft.TimeWindow",
        "Parameters": {
          "Start": "2022-01-26T06:00:00+00:00",
          "End": "2022-01-26T18:00:00+00:00"
        }
      }
    ]
  }
}
The above configuration will enable the MobilDeatiledeReview feature on 26th January 2022 at 6 AM and disable it at 6 PM on 26th January 2022.
You can compile & run the code to verify that the above changes are providing the desired results or not. You specify the start as the current machine time when you are running the code and the end time as 1-2 minutes apart from the start time.
There are other built-in feature filters as well that you can explore and use as per your requirements and needs to implement Feature Flags in ASP.NET Core
Feature Flag Drawbacks
The feature flags in ASP.NET Core does add some dependency & complexity to the application as feature flags need to be managed and will also require maintenance.
In the long run, once a new feature is enabled for all the users and very well established on production such that it will never be reverted then in that case you need to consider removing that feature flag code and its configuration as well.
When you develop a feature with a feature flag option then there are additional testing needs for the application as you need to also test that feature is working as per the feature flag logic added to the application
Summary
We learned about how we can implement feature flags in ASP.NET Core to control the way features are released or enabled on production. The feature flags in ASP.NET Core gives you much better control over the features you are releasing to the production and thus provide you with a way to avoid errors by releasing the features to all users at the same time.
You can enable features for limited users and once you are satisfied with the results then you can enable it for all users. You can even launch the feature at the desired date-time by specifying the Time Window filter.
Using feature flags in ASP.NET Core makes rollback of the feature easy as it does not require the deployment of any binaries.
Please provide your suggestions & questions in the comments section below
You can check my other trending articles – Build Resilient Microservices (Web API) using Polly in ASP.NET Core & Microservices with ASP.NET Core 3.1 – Ultimate Detailed Guide
References – Feature Flags in ASP.NET Core Application
Download Source Code
Here you can download the complete source code for this article demonstrating how to implement Feature Flags in ASP.NET Core
https://github.com/procodeguide/ProCodeGuide.Samples.FeatureFlagsDemo
Hope you found this article useful. Please support the Author



Cool, just in time for my learning schedule.
What I missed was an example on how to set feature filter for a particular user or maybe even a group of users.
Also, can the feature filters be mixed? For example percentage + timed? Or probably more realistic – group of users for a period of time?
I also found a curious problem – using the 50% percentage filter, on refresh I often get into a situation when the menu position “Mobile Reviews” is gone, but the in Home.cshtml shows “Welcome – Mobile Review Application” or the reversed (“Mobile Review” is shown & = “Welcome”). I thought of using IFeatureManagerSnapshot in HomeController, but I image I would also have to use something similar in _Layout.cshtml. What tag helper (or attribute on the ) should be used for that?
Thanks for your feedback. For your problem with 50% between message and menu just replace IFeatureManager with IfeatureManagerSnapshot (no other change in view) then that problem should be gone. Yes, it’s possible to mix features flags – check the section “Combining Multiple Feature Flags”. I wanted to cover feature control based on the specific user as well but already the article was very lengthy so thought of covering it as a separate article. I will work on part 2 of this article and cover feature control with the user and user groups. Thanks
I did not express myself clearly – I switched to IFeatureManagerSnapshot, but I continued to have the same problem. So eventually I tracked it to accidental duplication in DI registration – I had
builder.Services.AddFeatureManagement()
added two time. This is what was screwing with my results.
Thanks!