This article will cover details about how to implement custom identity user management in ASP.NET Core. We will build an ASP.NET Core MVC web application with a customized implementation of Identity to better understand the concepts of Identity and how we can override the default features of Microsoft Identity in ASP.NET Core for custom user management in ASP.NET Core.

This is the sixth post in the Series – ASP.NET Core Security. In my previous posts, I covered how to get started with ASP.NET Core Identity, understanding claims/roles, implementing claims/roles-based authorization, Cookie-based authentication in ASP.NET Core and OAuth2/OpenID Connect in ASP.NET Core.
- ASP.NET Core Identity – Getting Started
- ASP.NET Core Identity Claims-based Authorization
- ASP.NET Core Identity Identity Roles based Authorization
- Implement Cookie Authentication in ASP.NET Core
- Secure Applications with OAuth2 and OpenID Connect in ASP.NET Core 5 – Complete Guide
- Custom Identity User Management in ASP.NET Core – Detailed Guide
Table of Contents
Introduction to Microsoft Identity
Microsoft Identity help developers build ASP.NET Core applications that allow users to sign in to the application using either a Microsoft Identities account or a social account. Microsoft Identity also supports the development of secure APIs by enabling developers to provide authorized access to APIs.
Here is the list of essential components that are part of the Microsoft Identity Platform
- OAuth 2.0 and OpenID Connect – Provides functionality to authenticate several identity types, including work or school account provision by Azure AD, personal Microsoft accounts like skype or Xbox, Social accounts, local accounts, etc.
- Open Source Libraries – Support for Microsoft Authentication Libraries and for other standards-compliant libraries
- Developer Content – A detailed technical documentation that helps developers to get started with Microsoft Identity in their application.
With Microsoft Identity you can build an authentication application once and use it across many applications in your enterprise. Microsoft Identity even supports advanced features like passwordless authentication, step-up authentication and conditional access.
Using Microsoft Identity you can build secure applications of different types such as Web Applications, Web API, Single-Page Applications, Desktop Applications, Mobile Applications, etc.
Implement Custom Identity User Management in ASP.NET Core
For demonstration application development purposes, we will make use of Visual Studio Community 2022 Version 17.3.3 with .NET 6.0 SDK to implement custom identity user management in ASP.NET Core
Overall Approach for Demonstration Application
For the demonstration of how to Implement Custom Identity User Management in ASP.NET Core Web Application MVC, we will take the following approach
- We will first create the ASP.NET Core MVC Application project in Visual Studio 2022
- Then we will add Microsoft Identity to the ASP.NET Core MVC Application by Scaffolding
- We will change the default name of the Identity Tables to create identity tables with the name we specify
- Next, we will introduce a couple of custom fields in the Identity User class to capture the FullName and Picture of the user that are required in the project
- We will make the required changes in the default provided Identity Register Page to capture the custom user management fields
- We will make the required changes in the default provided Identity Profile Page to modify the custom user management fields
Create the required ASP.NET Core Project
Create a new project of type ASP.NET Core Web App MVC as per the screenshot shown below with the name as ProCodeGuide.Samples.CustomUserManagement
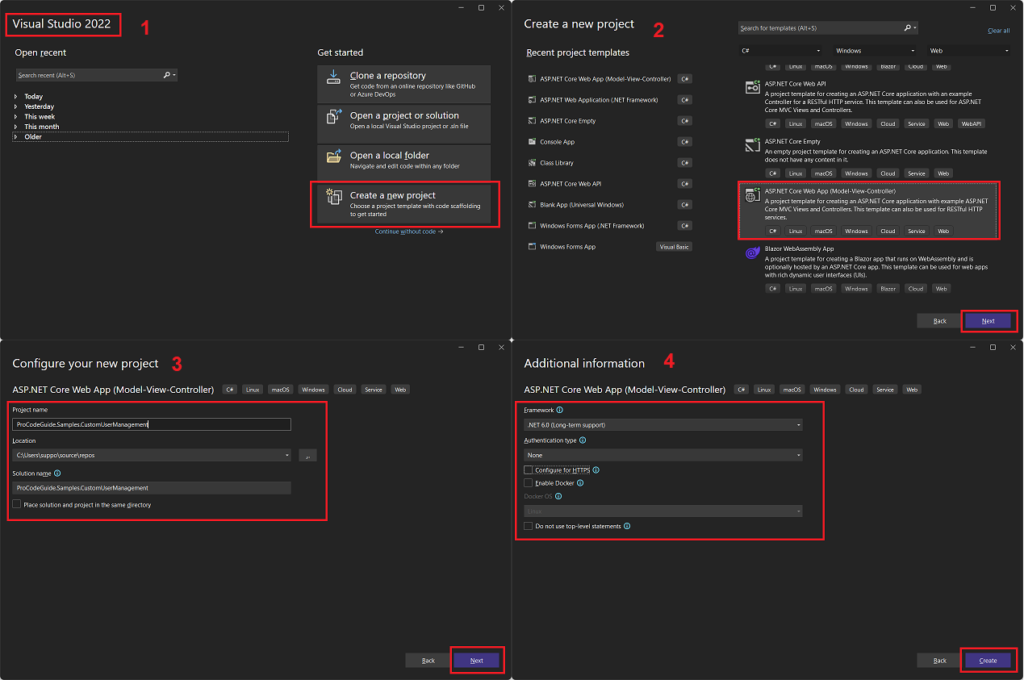
The ASP.NET Core web project created does not contain any reference to Identity as we selected None for authentication so next, we will have to add the identity reference and components using scaffolding
Scaffolding the Identity UI
Add Identity Reference & Components
To add Identity references and components you will have to right-click on the project in the solution explorer and select Add->New Scaffolded Item from the context menu as shown in the below screen
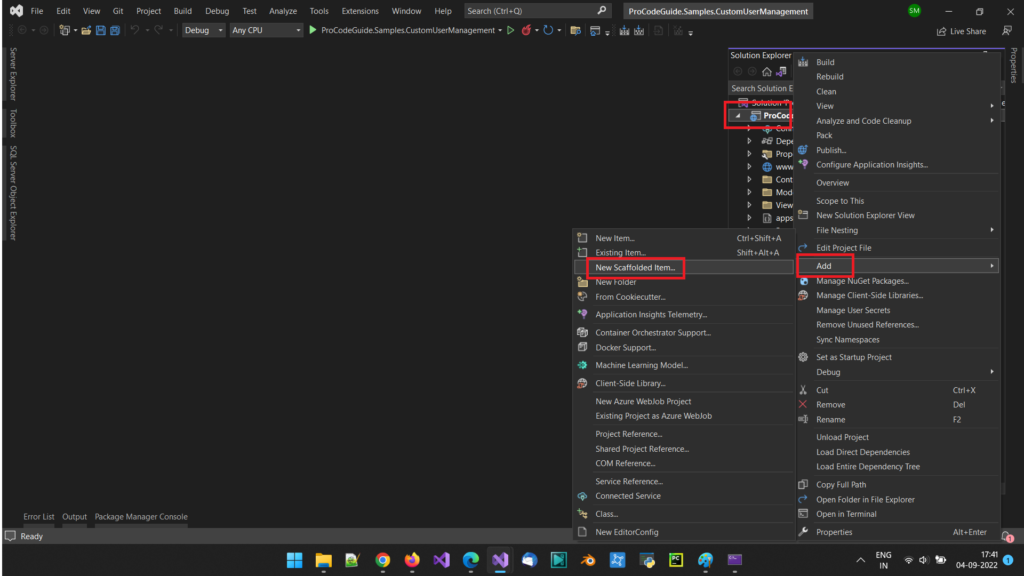
On selection of the above menu item, the below screen will be displayed where we need to select the Identity component and then click on the Add button
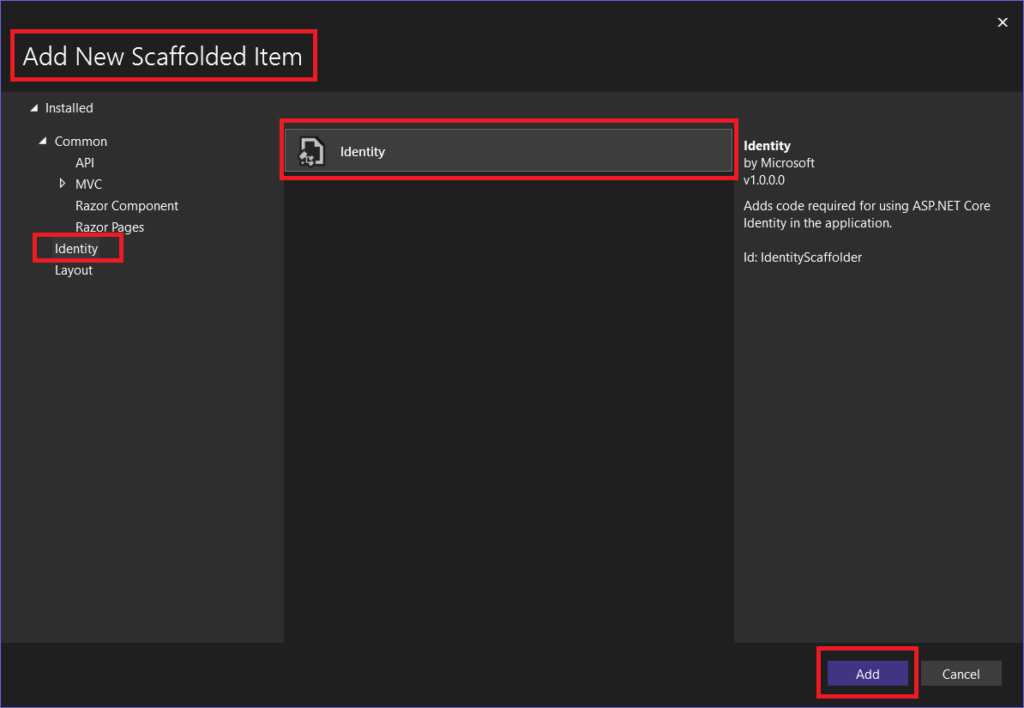
After clicking the Add button the below screen will be displayed where we can configure the components of the Microsoft Identity that will be added to the project.

In the above screen perform the following actions and then click on the Add button
- Select the _Layout.cshtml that is being used by the application.
- Select the checkbox for override all files as this should add all the Identity files to the application
- Add the data context class (ApplicationContext) to the application by clicking on the plus (+) sign given against the Data context class
- Add the custom User class (ApplicationUser) to the application by clicking on the plus (+) sign given against the User class
After clicking on the Add button it will add all the required Identity files to the project as shown in the screen below

Now that we have added the required Identity components in the ASP.NET Core project still when you run the application you will not be able to see the required Login & Register Menu Items. To wire the Identity UI to the ASP.NET core MVC web App we need to configure the Identity in ASP.NET Core Project.
Configure Identity UI in ASP.NET Core MVC Web App
To wire the Identity UI in the project you need to perform changes in the Program.cs and _Layout.cshtml files as discussed below
In the Program.cs file you need to add the below code to include the Identity default UI and also the Map the Identity razor pages.
builder.Services.AddDefaultIdentity<ApplicationUser>(options => options.SignIn.RequireConfirmedAccount = true)
                .AddEntityFrameworkStores<ApplicationContext>()
                .AddDefaultUI()
                .AddDefaultTokenProviders();

builder.Services.AddRazorPages();

app.MapRazorPages();

//keep the exising code
//Exising code has not been shown here to keep focus on just the new code being added
//You can refer to the complete code on GitHub
In the Views/Shared/_Layout.cshtml file you need to include the _LoginPartial.cshtml file as per the code shown below
<div class="col-md-2">
    <partial name="_LoginPartial.cshtml" />
</div>
@*
keep the exising code
Exising code has not been shown here to keep focus on just the new code being added
You can refer to the complete code on GitHub
*@
After making the above changes to the project, build & run the project. On the home page of the application, you should be able to see the menu items for Register & Login and also clicking on those Menu items should take you to the required default Identity UI pages.
Override default Identity table names
If you don’t want that the Identity tables should follow the default naming scheme of the Identity framework then in that case you can specify your own table names for the Identity-related tables.
For specifying custom names for Identity tables you need to make the below changes in the Areas\Identity\Data\ApplicationContext.cs File. You will have to specify the code for renaming the Identity table names in the OnModelCreating function of the ApplicationContext class.
public class ApplicationContext : IdentityDbContext<ApplicationUser>
{
    public ApplicationContext(DbContextOptions<ApplicationContext> options)
        : base(options)
    {
    }

    protected override void OnModelCreating(ModelBuilder builder)
    {
        base.OnModelCreating(builder);
        // Customize the ASP.NET Identity model and override the defaults if needed.
        // For example, you can rename the ASP.NET Identity table names and more.
        // Add your customizations after calling base.OnModelCreating(builder);

        RenameIdentityTables(builder);
    }

    protected void RenameIdentityTables(ModelBuilder builder)
    {
        base.OnModelCreating(builder);
        builder.HasDefaultSchema("CstUserMngt");
        builder.Entity<ApplicationUser>(entity =>
        {
            entity.ToTable(name: "Users");
        });
        builder.Entity<IdentityRole>(entity =>
        {
            entity.ToTable(name: "Roles");
        });
        builder.Entity<IdentityUserRole<string>>(entity =>
        {
            entity.ToTable("UserRoles");
        });
        builder.Entity<IdentityUserClaim<string>>(entity =>
        {
            entity.ToTable("UserClaims");
        });
        builder.Entity<IdentityUserLogin<string>>(entity =>
        {
            entity.ToTable("UserLogins");
        });
        builder.Entity<IdentityRoleClaim<string>>(entity =>
        {
            entity.ToTable("RoleClaims");
        });
        builder.Entity<IdentityUserToken<string>>(entity =>
        {
            entity.ToTable("UserTokens");
        });
    }
}
In the above code, we have set the schema for the database and then we have specified the table names for the Identity tables. You can specify the table names of your choice as per your application standards or organization standards that make more sense and makes it easier to understand.
Now that we have added & configured Identity it’s time to apply the migrations & update the database. To apply migrations & create a database for the application we need to run the following commands in the package manager console.
add-migration InitialMigration
update-database
Once the above commands are completed successfully then the database as per the configured connection string in the appsettings.json will be created. In our case, it has created the database in SQL Server as shown below

The above table names look much better and more appropriate for the application compared to the default Identity specified table names.
Add Custom Fields to Identity User
When you apply migration and update the database then the default Identity users table is created with the predefined columns in the table. Now if you have a requirement to capture the additional custom fields for the user then in that case you will have to extend the default Identity User.
While adding the Identity to the application we added the User Class Areas\Identity\Data\ApplicationUser.cs. This is the application extension class for the User that derives from IdentityUser. This extended user class is even registered in the applications Identity configuration i.e. in the Program.cs file and the ApplicationContext class
So now whatever required fields you will add in this new User class ApplicationUser will be part of the Identity users table when you apply migration and update the database
We will add the below fields to the ApplicationUser class
public class ApplicationUser : IdentityUser
{
    public string? FullName { get; set; }
    public byte[]? Picture { get; set; }
}
We have added 2 custom fields to the Identity User i.e. FullName & Picture. The FullName field will be used to capture the full name of the user and the Picture field as the name suggests will be used to capture the profile picture of the user being registered.
Let’s run the migration command and update the database. To apply migrations & update the database for the application we need to run the following commands in the package manager console.
add-migration "Update Custom Identity User Fields"
update-database
Once the above commands are completed then the Identity User table is created as per the fields shown below

As you can see from the above table definition that the new fields FullName and Picture are now part of the Identity User table. Next, we will have to add code in the default Identity register and manage profile pages to capture and modify these fields as part of those pages in the application.
Implement Custom Identity Registration Page
Let’s run the application and navigate to the Register Page. The register is the page where new users are created for the application. On the register page, the users register themselves to the application by specifying the email id & the password that are part of the default identity register page.
Now that we have added the required custom fields in the Identity user we will have to modify the default Identity register page to capture the Full Name and picture of the user while creating the user in the application.
To capture and save this full name and picture to the database we will have to make changes in two parts of the code.
- Customise the HTML part of the CSHTML page to include new fields Full Name & Picture
- Modify the C# file of the CSHTML page to read and save the full name & picture to the database.
Add the below code in the Areas/Identity/Pages/Account/Register.cs C# file to read & save the Full Name and Picture of the user to the database when the user tries to save the data on the register page.
In the InputModel class of the Register.cs file, let’s add 2 new properties, Full Name, and Picture.
public class InputModel
{
    [Required]
    [StringLength(25, ErrorMessage = "The {0} must be at least {2} and at max {1} characters long.", MinimumLength = 5)]
    [Display(Name = "Full Name")]
    public string FullName { get; set; }

    [Display(Name = "User Picture")]
    public byte[] Picture { get; set; }

    //keep the exising code
    //Exising code has not been shown here to keep focus on just the new code being added
    //You can refer to the complete code on GitHub
}
In the OnPostAsync method in the Register.cs file, add code to pass the above properties and save it to the database.
public async Task<IActionResult> OnPostAsync(string returnUrl = null)
{
    user.FullName = Input.FullName;

    if (Request.Form.Files.Count > 0)
    {
        IFormFile file = Request.Form.Files.FirstOrDefault();
        using (var dataStream = new MemoryStream())
        {
            await file.CopyToAsync(dataStream);
            user.Picture = dataStream.ToArray();
        }
    }

    //keep the exising code
    //Exising code has not been shown here to keep focus on just the new code being added
    //You can refer to the complete code on GitHub
}
In the above code, we have linked the new custom identity user fields to the registration user model so that they are saved to the database along with the user object.
Next, let’s add the custom identity user fields to the Register.cshtml page
Add the below code in the Areas/Identity/Pages/Account/Register.cshtml page to capture the Full Name and Picture of the user when the user tries to register himself.
<form id="registerForm" asp-route-returnUrl="@Model.ReturnUrl" method="post"  enctype="multipart/form-data">
    <div class="form-floating">
        <input asp-for="Input.FullName" class="form-control" autocomplete="FullName" aria-required="true" />
        <label asp-for="Input.FullName"></label>
        <span asp-validation-for="Input.FullName" class="text-danger"></span>
    </div>

    <div class="col-md-6">
        <div asp-validation-summary="ModelOnly" class="text-danger"></div>
        <div class="form-group">
            <label asp-for="Input.Picture" style="width: 100%;"></label>
            <img id="imgPicture" style="width:350px;height:350px; object-fit:cover" src="">
            <input type="file"
                    accept=".png,.jpg,.jpeg"
                    asp-for="Input.Picture"
                    class="form-control"
                    style="border:0px!important;padding: 0px;padding-top: 10px;padding-bottom: 30px;"
                    onchange="document.getElementById('imgPicture').src = window.URL.createObjectURL(this.files[0])" />
            <span asp-validation-for="Input.Picture" class="text-danger"></span>
        </div>
    </div>
</form>
@*
keep the exising code
Exising code has not been shown here to keep focus on just the new code being added
You can refer to the complete code on GitHub
*@
Now that we have made the required changes to the register page let’s check the result. Build and run the application. Click on the Register link in the application that should navigate to the register page. On the registration page, you should be able to see the new custom fields Full Name & Picture that were added to extend the registration page. Add details to the registration form and click on the register button as shown below
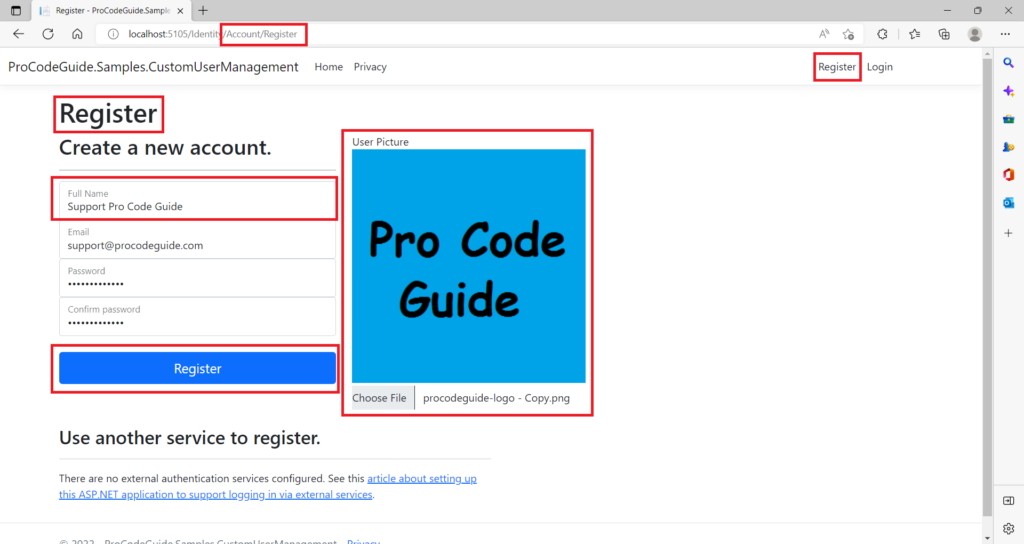
After the user is created you will have to confirm the email id using the link available after the successful user registration. You can log in to the application using the credentials of the newly created user.
Next, we will have to add code to the default Identity profile page to allow users to modify custom fields Full Name & Picture in the application.
Implement Custom Identity User Profile Page
Let’s run the application and log in to the application using the user created as part of registration. Navigate to the profile page by clicking on the user email id that is displayed on the right-hand side of the page. The managed profile is the page where logged-in users can modify their personal data, change the login password, etc.
Now that we have added the required custom fields in the Identity user and also captured the same on the user registration page. we will have to provide a feature to manage these fields by allowing users to modify the custom field full name or picture. For this, we will have to extend the default Identity manage profile page to allow modification of the Full Name and picture of the user in the application.
To allow modification of the full name or picture and then save it to the database we will have to make changes in two parts of the code.
- Customise the HTML part of the CSHTML page to include new fields Full Name & Picture
- Modify the C# file of the CSHTML page to load the value from the database, allow modification and save the full name or picture to the database.
Add the below code in the Areas/Identity/Pages/Account/Manage/Index.cs C# file to load, read & save the Full Name or Picture of the user to the database when the user tries to modify the data on the profile page.
In the InputModel class of the Index.cs file, let’s add 2 new properties, Full Name, and Picture.
public class InputModel
{
    [Display(Name = "User Picture")]
    public byte[] Picture { get; set; }

    [Required]
    [StringLength(25, ErrorMessage = "The {0} must be at least {2} and at max {1} characters long.", MinimumLength = 10)]
    [Display(Name = "Full Name")]
    public string FullName { get; set; }

    //keep the exising code
    //Exising code has not been shown here to keep focus on just the new code being added
    //You can refer to the complete code on GitHub
}
In the LoadAsync method in the Index.cs file, add code to load the new custom fields from the database when the page loads.
private async Task LoadAsync(ApplicationUser user)
{
    var userName = await _userManager.GetUserNameAsync(user);
    var phoneNumber = await _userManager.GetPhoneNumberAsync(user);

    var fullName = user.FullName;
    var Picture = user.Picture;

    Username = userName;

    Input = new InputModel
    {
        PhoneNumber = phoneNumber,
        FullName = fullName,
        Picture = Picture
    };
}
In the OnPostAsync method in the Index.cs file, add code to pass the new custom fields and save it to the database.
public async Task<IActionResult> OnPostAsync()
{
    var fullName = user.FullName;
    if (Input.FullName != fullName)
    {
        user.FullName = Input.FullName;
        await _userManager.UpdateAsync(user);
    }

    if (Request.Form.Files.Count > 0)
    {
        IFormFile file = Request.Form.Files.FirstOrDefault();
        using (var dataStream = new MemoryStream())
        {
            await file.CopyToAsync(dataStream);
            user.Picture = dataStream.ToArray();
        }
        await _userManager.UpdateAsync(user);
    }

    //keep the exising code
    //Exising code has not been shown here to keep focus on just the new code being added
    //You can refer to the complete code on GitHub
}
In the above code, we have linked the new custom identity user fields to the manage profile user model so that on modification they are saved to the database along with the user object.
Next, let’s add the custom identity user fields to the Index.cshtml page
Add the below code in the Areas/Identity/Pages/Account/Manage/Index.cshtml page to load the Full Name and Picture of the user when the page loads and also allow the modification of these fields by the user.
<form id="profile-form" method="post" enctype="multipart/form-data">
    <div class="form-group">
        <label asp-for="Input.FullName"></label>
        <input asp-for="Input.FullName" class="form-control" />
        <span asp-validation-for="Input.FullName" class="text-danger"></span>
    </div>

    <div class="col-md-6">
        <div asp-validation-summary="ModelOnly" class="text-danger"></div>
        <div class="form-group">
            <label asp-for="Input.Picture" style="width: 100%;"></label>
            @if (Model.Input.Picture != null)
            {
                <img id="Picture" style="width:350px;height:350px; object-fit:cover" src="data:image/*;base64,@(Convert.ToBase64String(Model.Input.Picture))">
            }
            else
            {
                <img id="Picture" style="width:350px;height:350px; object-fit:cover" src="">
            }
            <input type="file"
                    accept=".png,.jpg,.jpeg,.gif,.tif"
                    asp-for="Input.Picture"
                    class="form-control"
                    style="border:0px!important;padding: 0px;padding-top: 10px;padding-bottom: 30px;"
                    onchange="document.getElementById('Picture').src = window.URL.createObjectURL(this.files[0])" />
            <span asp-validation-for="Input.Picture" class="text-danger"></span>
        </div>
    </div>
</form>
@*
keep the exising code
Exising code has not been shown here to keep focus on just the new code being added
You can refer to the complete code on GitHub
*@
Now that we have made the required changes to the manage profile page let’s check the result. Build and run the application. Log in to the application using the user account created during registration. Navigate to the profile page by clicking on the user email id that is displayed on the right-hand side of the page. You can see in the below screen that the manage profile page on load is displaying the Full Name & Picture of the user that was set during the registration of the user.
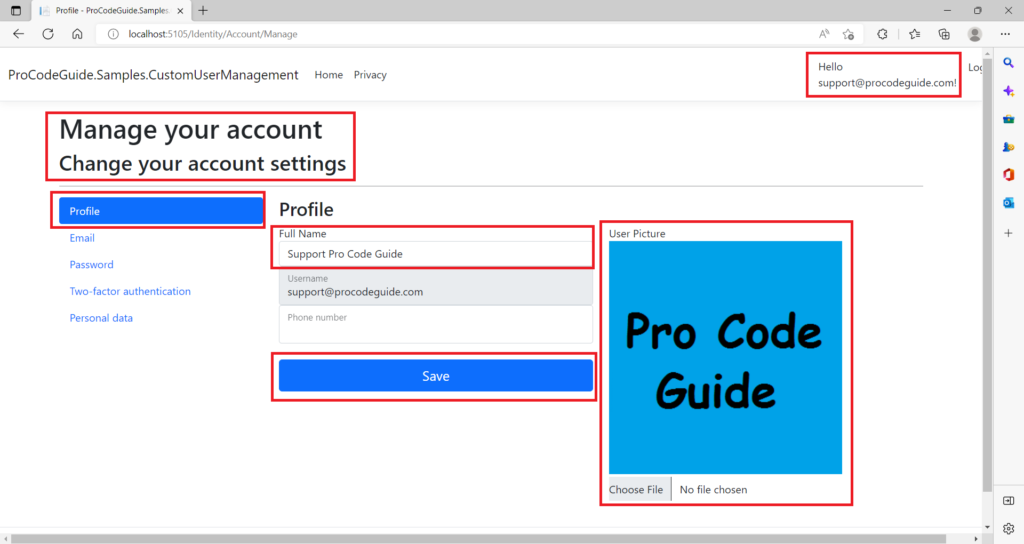
You can modify the Full Name and Picture of the user on the above screen and then click on the save button to save the changes back to the database. So using this custom identity manage profile page users can modify the custom fields added to the Identity User.
Summary
We learned how to implement custom Identity user management in ASP.NET Core Application. Using this custom Identity user management in ASP.NET Core we can extend the functionality of the Microsoft Identity to change the default table names, user profile, registration, manage profile, etc.
Many times in the new project there are requirements from the client to capture additional fields for the user registration and these additional fields are not part of the default Identity user. To meet the requirements of the client regarding additional Identity user fields you can extend the Identity User, Registration Page & Profile Page as we have discussed in the article above.
Please provide your suggestions & questions in the comments section below
References – Microsoft Identity Platform
Download Source Code
Here you can download the complete source code for this article demonstrating how to implement custom Identity user management in ASP.NET Core Application.
https://github.com/procodeguide/ProCodeGuide.Samples.CustomUserManagement
You can also check my other trending articles on .NET Core to learn more about developing .NET Core Applications
- Microsoft Feature Management – Feature Flags in ASP.NET Core C# – Detailed Guide
- Microservices with ASP.NET Core 3.1 – Ultimate Detailed Guide
- Entity Framework Core in ASP.NET Core 3.1 – Getting Started
- Series: ASP.NET Core Security – Ultimate Guide
- ML.NET – Machine Learning with .NET Core – Beginner’s Guide
- Real-time Web Applications with SignalR in ASP.NET Core 3.1
- Repository Pattern in ASP.NET Core with Adapter Pattern
- Creating an Async Web API with ASP.NET Core – Detailed Guide
- Build Resilient Microservices (Web API) using Polly in ASP.NET Core
Hope you found this article useful. Please support the Author




So how do you access the custom properties in a controller?