In this article, we will learn about the things you should consider and focus on while migrating your existing applications from .NET Framework to .NET Core or NET 6. The migration to .NET 6 should not be that difficult provided the third-party packages being used in your .NET Framework-based application are supported on .NET 6 as well.
This is the fourth post in the series – Getting Started with .NET Platform, .NET Framework & .NET Core (.NET 5+)
- Post 1 – Introduction to .NET Framework
- Post 2 – Introduction to .NET Core (.NET 5+)
- Post 3 – .NET Framework vs .NET Core (.NET 5+)
- Post 4 – Migrate from .NET Framework to .NET Core (.NET 6) – Detailed Guide (this post)

There will always be a need to upgrade to the latest .NET Framework as old framework might be going out of support and also upgrading to latest frameworks provide benefits like migrating your application to the new & improved technology.
The existing .NET Framework applications for which project template is already available (such as a library, console app, desktop app) on .NET 6 are easier to migrate than those for which project templates are not available (e.g. ASP.NET). If the same app model is not available then at least an equivalent is available in .NET 6 for the conversion.
You should always migrate to the latest version of .NET Core available i.e. .NET 6 instead of the older versions. If you are porting a library that will be used in both .NET Framework and .NET core-based projects then you should port it to .NET standard.
Table of Contents
Migrate from .NET Framework to .NET Core (.NET 6)
The migration of applications from .NET Framework to .NET Core (any version) requires a lot more work as there are quite a few differences between the .NET Framework and other .NET Core platforms. There are multiple approaches available for migration either you can migrate using a tool that does much of the initial work for you or you can migrate manually without using any tool.
Migrating using a Tool
There is a tool provided by Microsoft for Migration to simply the overall process or work required for migration from .NET Framework to .NET core. Using this tool for migration will make the overall migration easier by automating lots of tasks that are involved in migration.
The instructions to download migration tool .NET Updrage Assistant are available here
You can also try the tool try-convert available on GitHub which is a simple tool that can help in migrating .NET Framework-based projects to .NET Core.
Manual Migration
There will be some complex projects which will fail on migration using the migration tool or if you want better control over the migration process then in that case you can opt for the manual migration. In this method, there will be no automation and everything will have to be migrated by hand.
The manual migration majorly happens in 5 steps as discussed below.
STEP 1 – Analyze Dependencies
But before you start your migration process thoroughly analyse all the third-party dependencies being used by your applications to ensure that they are either supported on .NET 6 or there are alternatives available for those dependencies like a new version of the same package or other packages with similar functionality. Yes, alternatives will involve some amount of work i.e. coding & testing so you need to decide whether you are ready to take that path.
For each referenced package, you need to check its compatibility with .NET 6. You can check the compatibility of each using the NuGet Gallery and look for the dependencies of the package. If the package has .NET Standard dependencies then it is going to be compatible with .NET 5+ as .NET supports all versions of the .NET Standard.
There is also a tool that offers more detailed information about package versions and dependencies. You can access that tool here to check package compatibility.
In .NET it is also possible to depend on the .NET Framework package but if you are doing so then you will have to test your .NET 6 application extensively so that there are no surprises later.
Once you are satisfied that all your third-party dependencies can be worked out with the new .NET 6 then you move to the next step.
STEP 2 – Prepare for Migration
To prepare for migration you need to make changes in the current .NET Framework project and bring it to the state that is more in line with the migration to the new .NET 6 project so that it simplifies the startup point for the migration.
Migrate packages.config file – In .NET Framework-based applications the references to external packages are stored in the packages.config file but this packages.config file is not supported in the .NET Core based projects as .NET 6 uses the project file to store these references to external packages. The project file makes use of the PackageReference property to specify the NuGet packages for your .NET Core based applications.
So you need to move these references from packages.config file to the project file in .NET 6. To make the necessary changes either you can prepare the file manually or use the option Migrate packages.config to PackageReference available in Visual Studio.
API Compatibility – API available in both .NET Framework & .NET Core is different so you must check the set of APIs being used in the .NET Framework-based application available on .NET and not. You need to change APIs that are not available in the target framework .NET 6. Also targeting your .NET Framework-based application to at least .NET Framework 4.7.2 as that ensures availability of latest API alternatives where .NET Standard does not support the API used in .NET Framework-based project.
You should consider adding a reference to Microsoft.Windows.Compatibility NuGet package as a large portion of the .NET Framework API is available in .NET Core via the NuGet package.
App.Config – The .NET Framework based projects has App.config file for configuration that needs to be replaced with appsettings.json in .NET Core projects
You can use the .NET Portability Analyzer tool to detect the APIs used in your project that aren’t present in .NET Core.
STEP 3 – Migrate Project File
The project file format that is used in .NET 6 based projects is different from .NET Framework based projects. The newer .NET 6 projects use the new SDK style project file format. You have the option to either create a new project file with the required format or modify the project file that you have to the required SDK style format.
If you want to keep the support of the designer in your project you must create a new .NET project in parallel with the old one and share assets. So if you want to modify the UI elements in designer then you can go to the old project in the corresponding visual studio to do that. Since assets are shared any changes in the old .NET Framework-based project will be updated in the new .NET 6 based project as well.
AssemblyInfo Considerations – In the newer .NET 6 project the Attributes are autogenerated and if the .NET Framework-based project contains an AssemblyInfo.cs then the definitions will be duplicated and this will result in a compiler conflict issue. You need to either disable autogeneration of Attributes or delete the older AssemblyInfo.cs file.
You can disable autogeneration of the Attributes in the .NET project by adding the below entries to the .NET project file
<Project Sdk="Microsoft.NET.Sdk">
  <PropertyGroup>
    <GenerateAssemblyInfo>false</GenerateAssemblyInfo>
  </PropertyGroup>
</Project>
Resources – Embedded resources are included automatically but resources aren’t, so you need to migrate the resources from the .NET Framework-based project to the new project file.
Update package references – Finally update the version number of the packages that you will be needing in the new .NET project and you have found to be compatible as part of the previous step ‘Prepare for Migration’
STEP 4 – Fix Code & Build
Fix your code as per the changes identified in Step 1 for the dependent library changes and Step 2 for API Compatibility. The complexity of your .NET Framework-based project will determine the amount of work required to fix the code for .NET 6 compatibility.
STEP 5 – Finally Run & Test your Application on .NET 6
Finally, after all of the previous steps have been completed successfully it’s time to run & test your code to ensure that everything works as expected i.e. to ensure that your .NET Framework to .NET Core Porting is successful
Technologies not available in .NET Core
There are few technologies in .NET Framework that are not available in .NET Core or .NET. Here is the list of such technologies
- AppDomains – Creating application domains is not available in .NET Core
- Remoting – Communication across application domains using remoting is no longer supported
- Code Access Security – Code Access Security (CAS) a sandboxing technique was replaced by Security Transparency in .NET Framework 4.0 and it is not supported in .NET Core
- WCF Server & Windows Workflow – Both Windows Communication Foundation (WCF) and Windows Workflow Foundation (WF) are not supported in .NET Core (.NET 5+)
- System.EnterpriseServices – COM+ is also not supported in .NET Core (.NET 5+)
How to use .NET Portability Analyzer?
For the demonstration of the .NET Portability Analyzer tool, we will be using the .NET Framework-based project which was developed as part of my other article How to Create PDF file in C# .NET – 5 Easy Steps and source code for this project can be downloaded from GitHub Repository ProCodeGuide.Samples.PDFSharp
First, you need to download & install the Visual Studio extension for .NET Portability Analyzer. The .NET Portability Analyzer is available for Visual Studio 2017 & 2019. We will be using Visual Studio 2019 for demonstration purposes.
In Visual Studio 2019 you can navigate to menu Extensions->Manage Extensions and search for ‘.NET Portability Analyzer’ under the Online option on Manage Extensions Screen as shown in the below screen.

You need to click download against the .NET Portability Analyzer and it will be installed after you close the Visual Studio as for extension installation any instance of Visual Studio should not be running on the machine.
Once installed then restart the Visual Studio 2019 and open the project ProCodeGuide.Samples.PDFSharp which was download from GitHub Repository
After the extension is installed you can verify it by right-clicking on the project file in the solution explorer and you should be able to see 2 menu options i.e. Portability Analyzer Settings and Analyze Project Portability.
Next, we will select the option Portability Analyzer Settings and select the target platforms which are the .NET Core platforms/versions that you want to evaluate your current project against.
Select the target platform in the Portability Analyzer Settings screen as shown below

We have selected the output format as Excel and Target Platforms as .NET 5.0 as still 6.0 is not available in this tool. We have left the default report file name unchanged. So analysis tool will generate the report in Excel format for gaps by comparing the target framework requirements with the current project version.
Next, we will again right-click on the project in solution explorer to select the option Analyze Project Portability. This will run the analysis on the selected project and generate a report. On successful execution, it will display generated report file in the Portability Analysis Results window as shown below

Since we had selected the output format for the report as excel so a .xlsx file has been generated and we can view this report in any excel viewer. If you don’t have an excel viewer installed then in that case you can select a different output format as well.
The generated report has three sections i.e. 3 sheets
Portability Summary – This section displays the portability percentage for each assembly in the project. If multiple projects are selected then in that case it will display for all the selected assemblies. This generated report shows 100% for our project assembly ProCodeGuide.Samples.PDFSharp for .NET 5.0.
Details – This detailed section displays report for each type used in the assembly. It provides information like whether the specific type is supported in the target framework or not. In this project all types in assembly ProCodeGuide.Samples.PDFSharp are supported in .NET 5.0
Unresolved assembly – This section displays the list of assemblies that are referenced or used by the project but were not analyzed by the .NET Portability Analyzer. If this assembly is your own project then you can analysis on that project as well but if it is a third party assembly then check it as per analyze dependency step discussed above under the Manual Migration process. If this third-party library is supported on .NET 5 then you are good to go ahead with the migration.
So this is how you install & use the .NET Portability Analyzer tool to check the compatibility of your .NET Framework-based project with the target framework. Next, let’s look at the demonstration of migrating a project from .NET Framework to .NET Core (.NET 6)
How to use try-convert for .NET Framework to .NET Core Migration?
We will try to migrate a .NET Framework-based project from .NET Framework to .NET Core using the tool try-convert. We will be migrating the same ProCodeGuide ProCodeGuide.Samples.PDFSharp project on which we saw how to use .NET Portability Analyzer.
Use the below command to install the try-convert tool from the command line in the command prompt tool
dotnet tool install -g try-convert

Once the tool is installed then on the command prompt we need to set the current directory as the project folder and run this tool to convert the given project from .NET Framework to NET 6.0. To convert the project we will use the command try-convert -tfm net6.0-windows -p ProCodeGuide.Samples.PDFSharp.csproj (the option -p is used to specify the path to the project to be converted since we are in the project folder we have specified just the project file name). The tfm is the target framework version that has been set to net6.0-windows
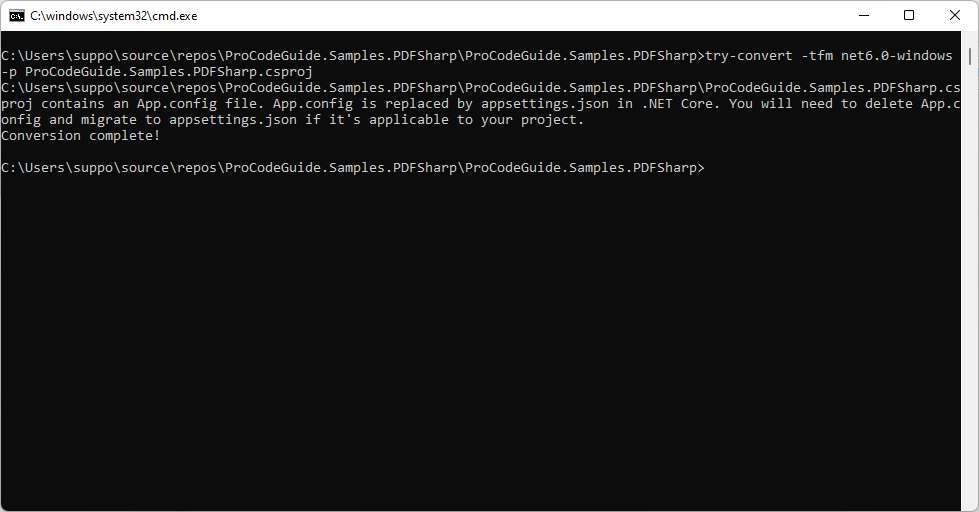
The above screen shows the output of the successful command to convert the project and it states that the old project has App.config file that needs to be replaced with appsettings.json in .NET Core.
Since we did not override the default behaviour of taking a backup before conversion so the tool has created a new .csproj file with the same name ProCodeGuide.Samples.PDFSharp.csproj and have renamed the existing project file to ProCodeGuide.Samples.PDFSharp.csproj.old
To revert migration changes you can anytime delete the new generated project file and rename the project file ending with the .old extension by removing the .old extension from the project filename
Next, let’s check the contents of the newly generated ProCodeGuide.Samples.PDFSharp.csproj file that has been migrated by the try-convert tool.
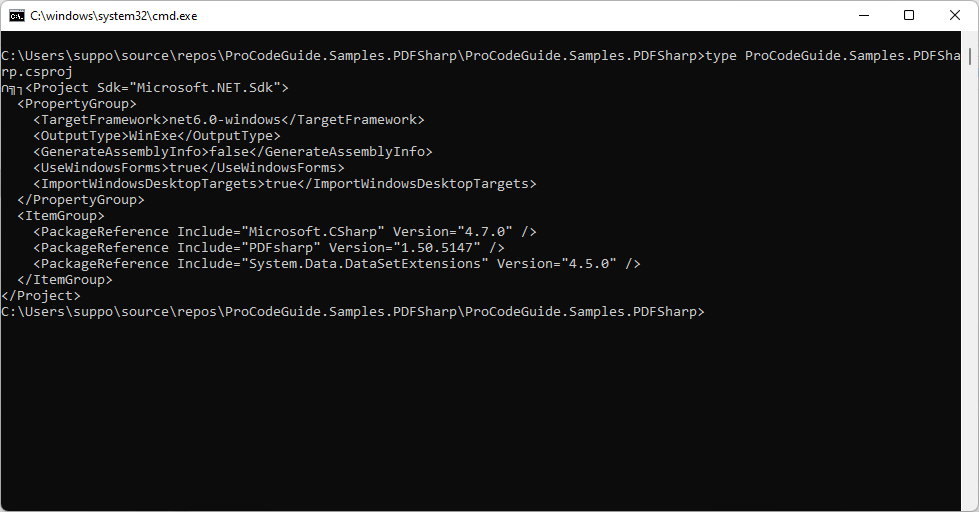
The above screen shows the content of the newly generated .csproj file. In this file, we can see that the file has been updated as per SDK style project file format and also references has been migrated as per PackageReference. The target framework has been set as net6.0-windows i.e. .NET 6.0 as we specified in the command
Next, we will try to build the project using command dotnet build. Since we are using this command from the project folder there is no need to specify the project file name as a parameter to the command.
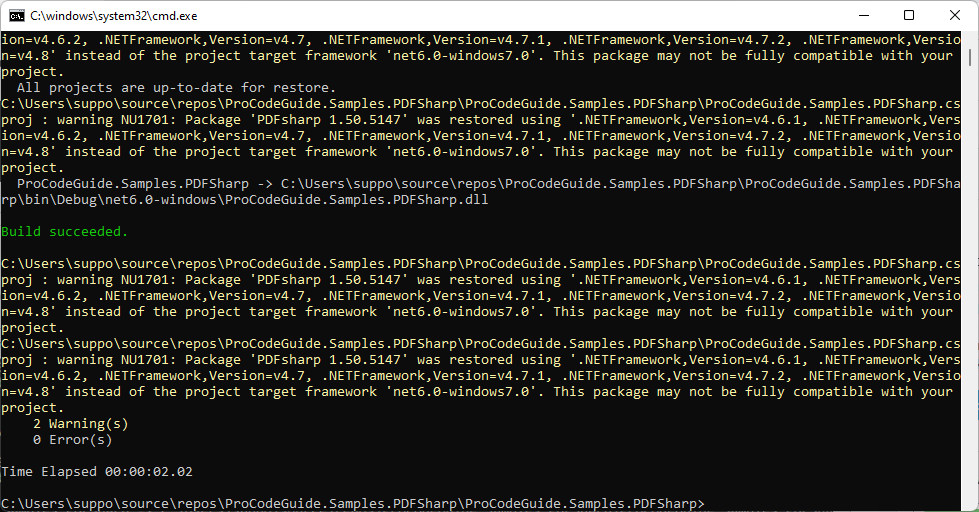
The above screen shows the output from the build command and its shows that the build process was successful but there are warning for the third party library PDFSharp as that library is not supported or available on .NET 6.0. So now if you run the project it will execute but it will throw an error when you click on the button ‘Generate PDF’.
So for full & successful conversion to .NET 6.0, you will have to look for an alternative for the PDFSharp library and replace it with the supported library for PDF creation.
In this section, we saw how to convert a .NET Framework-based project from .NET Framework to .NET Core using the try-convert tool.
Summary
We learned about ways to port the application from .NET Framework to .NET Core (.NET 6). My preferred approach is always the manual option as in that case you have better control over the new application code and new project files.
Hope you enjoyed reading this article. Please provide your suggestions & questions in the comments section below
References – Port from .NET Framework to .NET Core (.NET 6) & Migrating to the latest .NET
You can also check my other trending articles on .NET Core to learn more about .NET Core Applications
- Microsoft Feature Management – Feature Flags in ASP.NET Core C# – Detailed Guide
- Microservices with ASP.NET Core 3.1 – Ultimate Detailed Guide
- Entity Framework Core in ASP.NET Core 3.1 – Getting Started
- Series: ASP.NET Core Security – Ultimate Guide
- ML.NET – Machine Learning with .NET Core – Beginner’s Guide
- Real-time Web Applications with SignalR in ASP.NET Core 3.1
- Repository Pattern in ASP.NET Core with Adapter Pattern
- Creating an Async Web API with ASP.NET Core – Detailed Guide
- Build Resilient Microservices (Web API) using Polly in ASP.NET Core
Hope you found this article useful. Please support the Author

One Comment